
 Log in


You're holding a new towel bar against a finished bathroom wall, the drill already chucked with the bit that sailed through the studs in the garage. The glaze looks like painted plaster until the tip touches it. That first second is when most tiles crack, because the surface is thin and brittle, closer to a pane of glass than to wood or drywall.
A tile drill bit has to grind that surface instead of biting or hammering it. Pick the bit for the tile you have, decide how you'll control dust before the motor starts, drill only the tile layer, and change tools the moment the rim breaks through into whatever sits behind it.
Table of Contents
- Match the Tile Drill Bit to Your Tile
- Speed Pressure and Cooling That Keep Holes Clean
- When Water Beats a Vacuum for Dust
- How to Drill a Clean Hole in Tile
- What to Do After the Bit Breaks Through
- Fix Chips, Cracks, and Walking Bits
- Pick the Bit and Log the Job
Match the Tile Drill Bit to Your Tile
Glaze sits on the wall like a thin sheet of glass over plaster. Any bit that bites or hammers starts a crack that the rest of the hole only widens. The right match is a three-part decision: name the tile, choose abrasion over impact, and keep hammer mode off for as long as the bit is in the glaze.
If you're unsure which surface you have, a plain guide to porcelain tile durability for bathrooms is worth five minutes, because a hard vitrified floor tile will destroy a bit that was fine on a glossy wall tile.
The match table
| Bit type | Best on | How it cuts | Speed guide | Cooling |
|---|---|---|---|---|
| Spear-point glass and tile | Glazed ceramic and glass | Slow controlled abrasion | Low rotary speed | Water on the tip, no hammer |
| Diamond-coated tile bit | Porcelain and dense ceramic | Controlled abrasion | Follow the maker's rating; some run fast | Water strongly preferred |
| Diamond hollow core, example 8 mm | Hard ceramic, granite, marble, ordinary tile | Grinds a ring, light feed | Rated maximum set by the maker | Wet use |
| Carbide-tipped masonry | Softer ceramic only if the maker allows | Point cutting, often impact-oriented | Low speed, never hammer on tile | Dry possible; high chip risk on porcelain |
| Multi-purpose carbide | Brick, block, tile, fiber cement in mixed work | Multi-grind carbide head | Maker speed, light pressure | Cool on hard spots |
Walk the rows in that order and stop at the first one that names your tile. Each family carries its own speed band, so the maker's sheet for the bit in your hand is the only number worth copying. The cooling column doubles as your dust plan: decide whether water or a vacuum handles the slurry before the first turn.
Spear-point glass and tile bits suit glazed ceramic and glass. The carbide spear scrapes a dimple, then abrades a small hole the way a glass cutter scores a pane. They want a slow drill, water on the tip, and rotary only. They're the wrong default once the tile is a dense porcelain that feels closer to stone than dinnerware.
Diamond-coated tile bits are the everyday choice for porcelain and other dense ceramic. The rim is grit, no cutting lip, so it sands its way through instead of wedging the glaze apart. Some diamond tools are built to run far faster than a glass-and-tile spear. That faster number belongs to a different design, and it doesn't transfer to every bit in the drawer.
Diamond hollow core bits took over hard porcelain because they grind a ring and leave a plug instead of relying on a conventional tip. One standard-quality 8 mm ceramic diamond hollow bit specification lists hard ceramic tile, granite, marble, and ordinary tile, with a 93 mm overall length, a half-inch Belgian-thread connection, a maximum of 3,850 revolutions per minute, and a feed roughly 25–50% below glass drills depending on the job. You advance slower on purpose. Less push means less chipping, less heat, and a rim that lasts past the first hole. Diameter, thread, top speed, and wet use are the specs that separate this from a general bit.
Carbide-tipped masonry bits belong on softer ceramic only when the maker says the bit may be used that way. The tip is built to chip masonry, often with blows from a hammer drill. On porcelain that impact starts edge chips you can't sand out. If you want the difference between a small carbide insert and a full sharp edge, what a carbide drill bit is is the short mechanical picture.
Multi-purpose carbide covers mixed work: brick, block, tile, and fiber cement in one stack. Reach for it when the hole has to keep going into the layer behind the tile, and swap back to diamond or a fresh bit if the front face is hard porcelain.
Before you buy, circle four lines on the package. Diameter that matches the anchor or fitting. Connection, round shank or a thread your drill can hold. Maximum speed for that exact bit. Whether wet use is allowed. Those four items confirm it's a tile bit, and that the bit matches the tile instead of merely fitting the chuck.
Speed Pressure and Cooling That Keep Holes Clean
Once the bit matches the tile, a bigger motor won't give you a cleaner hole. Feed and heat decide that. Ceramic leaves the cut in two ways: ground away as fine slurry, or cracked off in chips. Extra pressure can feel faster for a second, then it throws chips off the rim or splits the tile outright.
Two speeds, two bits
Different bit families want very different speeds. Manufacturer drilling guidance from IRWIN puts a low speed near 300 RPM for glass, porcelain, and ceramic, roughly 2,700 RPM for diamond bits on hard and soft tile, and in one published test a 10 mm glass-and-tile bit ran at 450 RPM through 6 mm of ceramic rated 7 for scratch hardness, under a 10 kg test bias, and finished with twice as many holes per battery charge as competing products.
That spread between 300 and 2,700 comes from the tool itself, and neither figure is a default for the bit in your chuck. Glass-and-tile bits are meant for slow abrasion, while certain diamond tools are built to cut far faster. The same document advises switching hammer action off and keeping the cut wet. The test result shows what a matched speed and a cool rim can do for one bit; it does not turn 450 RPM into a setting for every tile drill bit sold.
Match RPM to the bit in the chuck, keep hammer mode off, and cool the cut. A harder lean doesn't buy a cleaner hole.
Start slow enough to hear a steady scrape. Chatter means the bit is skating or the speed is off for that tool. Keep the bit square to the surface and lean on the drill the way you'd lean a palm on a shop vise, firm and even. Forcing it like a stuck screw loads a brittle sheet until it fails beside the hole. If the motor bogs, the grit is plowing when it should be sanding.
Heat at the rim
Cooling happens at the diamond-to-tile face, and dry friction is what ruins it. Heat glazes the grit and bakes the ceramic until the rim chips; a wet tip keeps the contact face cool and carries the ground waste away as slurry. A small stream, a damp sponge, or a spray bottle is enough for a single hole. Pick the method before the first turn. Wet drilling is awkward beside outlets, open junction boxes, and freshly finished floors, so a dry-rated bit gets worked in short pulls with time for the steel to cool between them. How long you can stay on the trigger shifts with diameter, tile thickness, and how the diamonds are bonded. A large hole in thick porcelain needs shorter pulls than a small hole in thin wall tile.
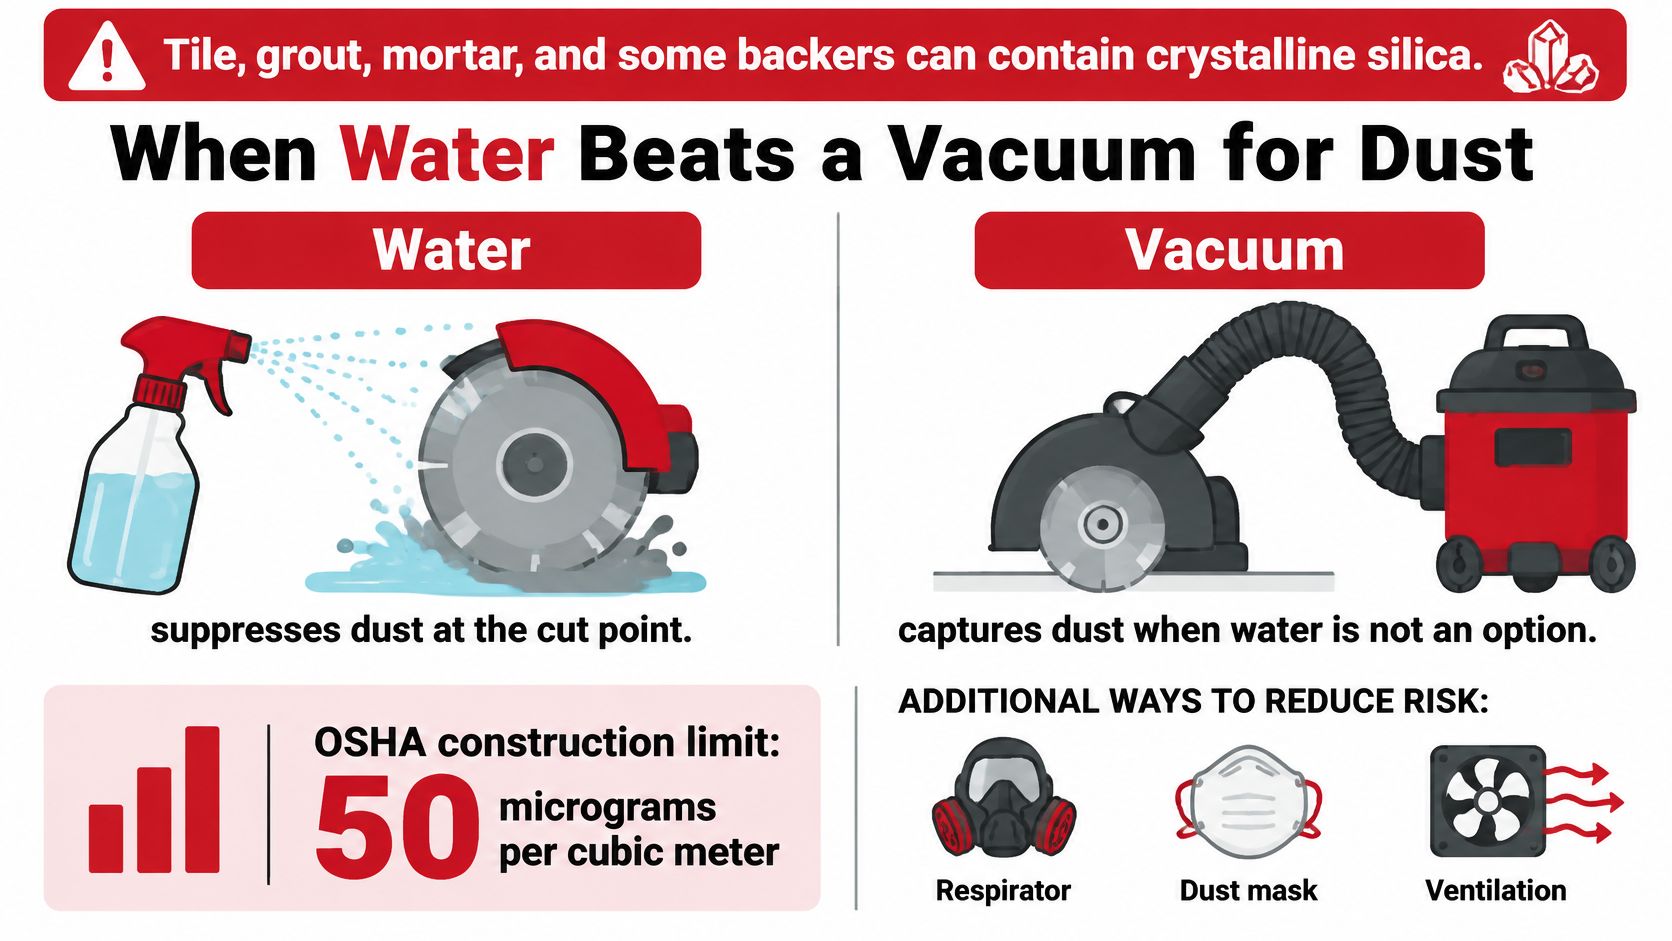
The graphic below lays out the same wet-or-dry decision from the dust side.
Pushing harder feels productive because the drill sounds busier. The diamonds overheat, dull, and stop cutting while the tile absorbs the load until it cracks at the edge of the hole. Light feed, the speed printed for that bit, and a cool rim will outrun a heavy hand every time.
When Water Beats a Vacuum for Dust
Water is not the only safe answer, and it isn't always the right one. Tile, grout, mortar, and some backers can contain crystalline silica. A dust mask alone doesn't replace a control that keeps that dust out of the air.
OSHA's construction silica guide sets a respirable-silica permissible exposure limit of 50 µg/m³ as an eight-hour time-weighted average, and it requires engineering and work-practice controls, including wet methods or dust collection. For handheld drills, when Table 1 controls apply, that guide calls for a compatible shroud or cowling, a dust collector with at least 99% filtration, and HEPA vacuuming for hole cleanup.
Decide the control before the first turn of the bit, the same way you decide which bit matches the tile. A diamond bit grinding dry through porcelain throws fine powder into the room air. The same bit running wet leaves that powder as a gray slurry ring around the hole, something you wipe instead of breathe. Watch a short pass on keeping slurry and dust out of the cut, then use the table for the room you're standing in.
Pick the control for the job
| Job | Preferred control | Why it changes |
|---|---|---|
| One or two holes in glazed ceramic | Light wet drilling or short pauses plus cleanup | Small dust volume, still don't blow dust |
| Repeated holes in porcelain | Wet methods | Longer exposure and more silica-bearing dust |
| Dry work near outlets or finished rooms | Shroud and collector meeting the guide's filtration level, then HEPA cleanup | Water threatens fixtures and finishes |
| Through tile into masonry or cement board | Shroud, specified airflow, HEPA vacuum, no compressed air | The silica limit and handheld-drill controls still apply |
One or two holes in glazed ceramic. A sponge and a light stream, or very short dry bursts with a careful wipe and vacuum afterward, can be enough. The dust volume is small. That doesn't make it harmless to puff it around the room.
Repeated holes in porcelain. Time and dust add up. Wet methods keep the silica in a slurry you can wipe, instead of a cloud you breathe for an afternoon of fixture layout.
Dry work beside outlets, finished floors, or moisture-sensitive board. Water on a live box or a just-painted floor creates a different mess. Fit a shroud or cowling to the drill, run a collector that meets the filtration level above, and HEPA-vacuum the hole when those controls apply. Source capture matters here as much as the bit does. Vent the room. Don't treat a cloth mask as the whole plan.
Through the tile into masonry or cement board. The same handheld-drill expectations stay in force once you're cutting silica-bearing material behind the glaze. Use a compatible shroud, the airflow the collector maker specifies, high-efficiency filtration, and HEPA cleanup.
Don't blow the hole clear
Compressed air is the cleanup people reach for because it's fast. It throws dust back into the air you just tried to control. Wipe slurry with a damp cloth. Vacuum dry dust. Don't blast the hole.
Wet methods control dust well, and they're a poor idea next to live electrics or finishes you can't soak. In those rooms, capture the dust at the bit. In a wet area with no outlets in the splash zone, water at the rim is usually the simpler control.
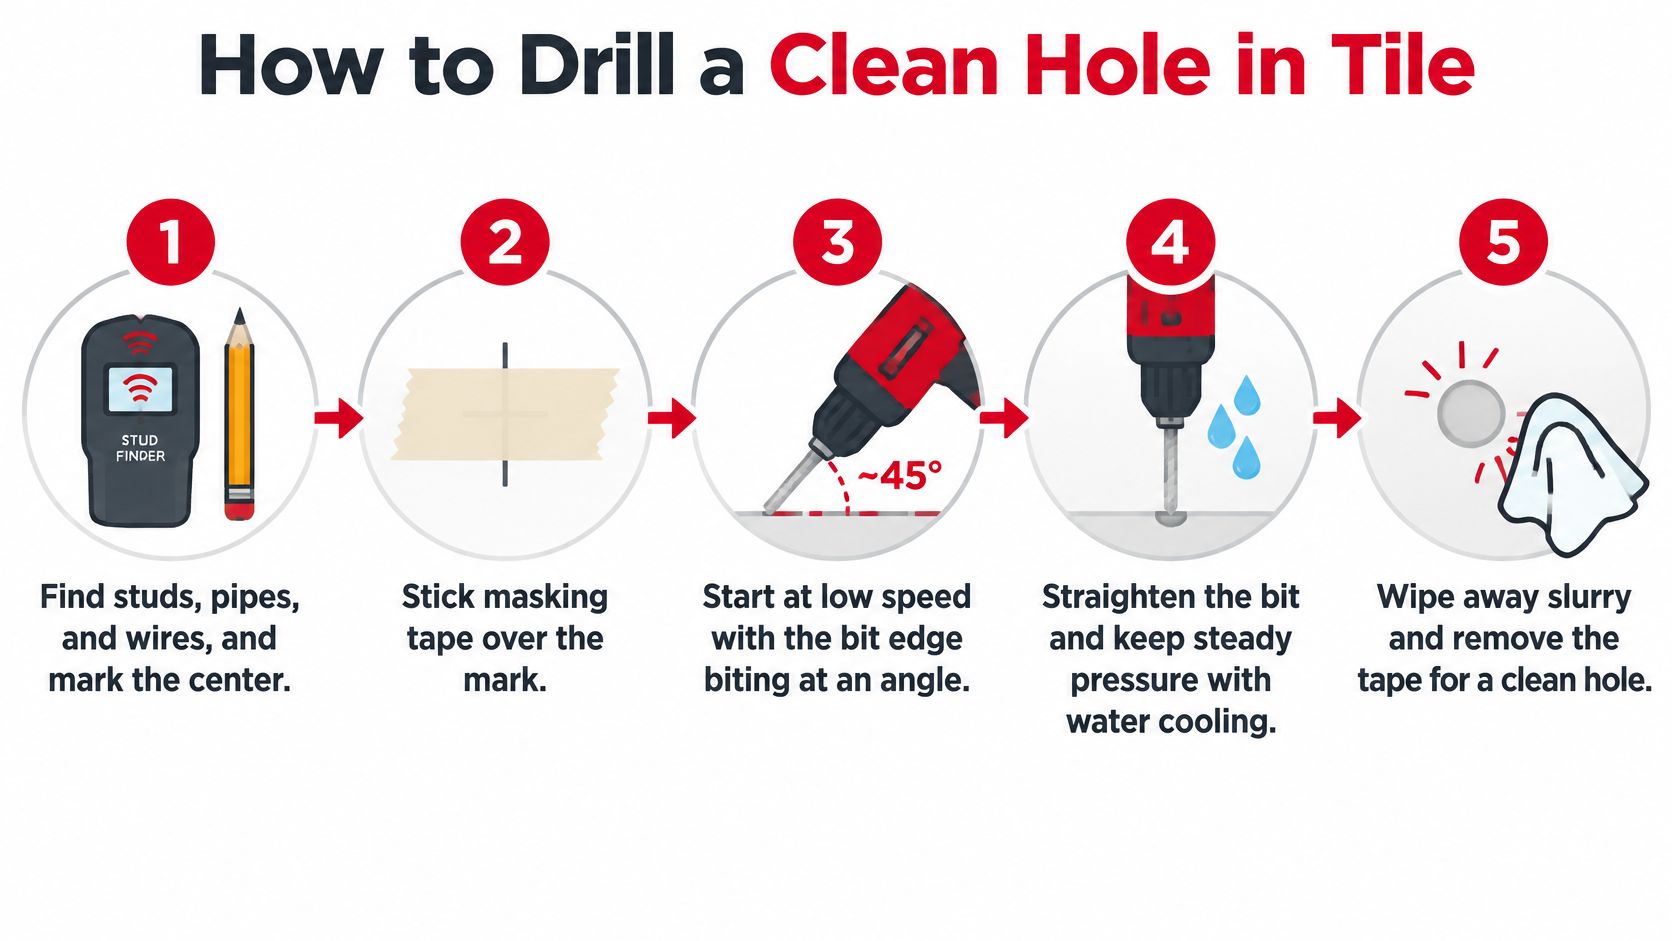
The five moves in this layout are the drilling sequence. Dust control sits on top of them, not after the hole is already full of powder.
How to Drill a Clean Hole in Tile
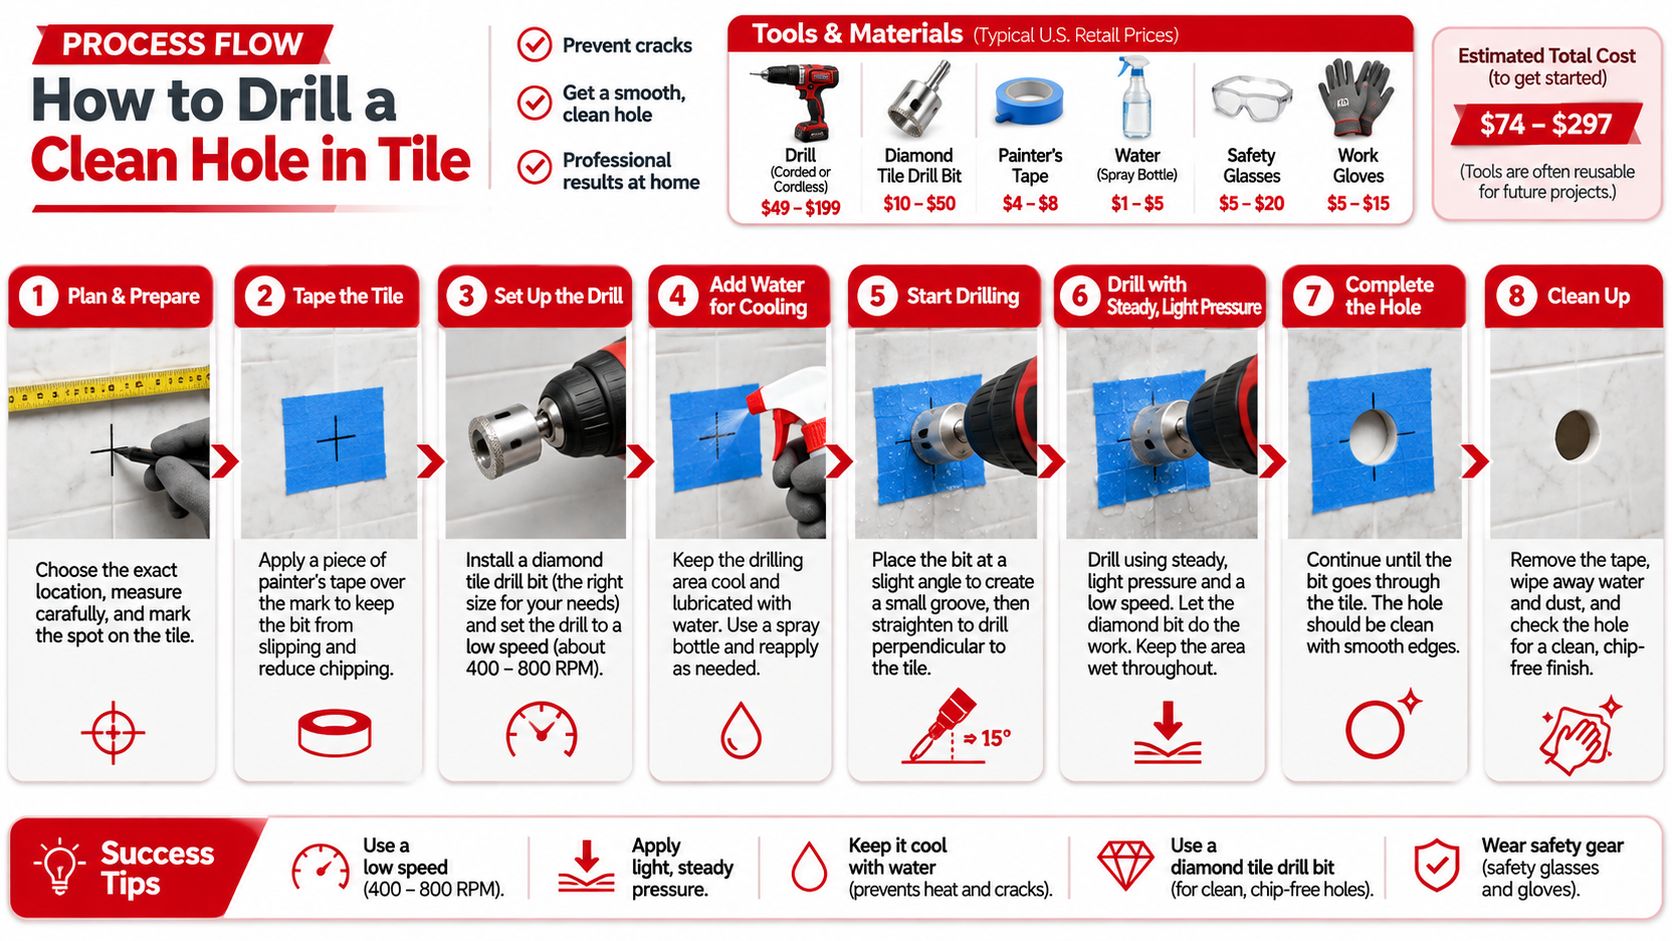
The mark is laid out, the bit is chosen, and the dust plan was settled before the drill came out. The job now shrinks to one task: cut through the ceramic and stop. Everything behind the tile is a different material that may want a different bit, and that pass comes later.
For porcelain and other dense ceramic, a diamond-coated tile drill bit is the better fit than a conventional carbide-tipped masonry bit, because it removes material by controlled abrasion instead of impact or point cutting. In a comparative drilling study, the diamond tile bit produced the cleanest and fastest cut among the bits tested, although it needed active water cooling, as described in a Carthage College drilling paper. Tile behaves under a bit the way glass does. Concentrated force can start median cracks under the contact zone, and lateral cracks can run out to the surface as edge chips. That's why the start stays slow, the pressure stays light, and hammer mode stays off.
The sequence
- Find what's behind the mark. Use a stud finder and, in a wet wall, assume pipes can sit where you don't expect them. Mark the center with a pencil or a grease pencil that shows on glaze. Drilling blind into a supply line ruins the hole and the room.
- Stop the bit from skating. Stick masking tape over the mark, or clamp a guide block with a hole the size of the bit. Polished porcelain is the worst surface for a wandering start. Lateral movement at the first touch raises local stress and enlarges the entry chip, which is why a pilot guide or template earns its keep on that first breakthrough.
- Back a loose tile. Set it flat on scrap plywood or a cement-board offcut so the exit face is supported. An unsupported exit blows out the back of the tile even when the entry looked perfect.
- Set rotary only, at the speed for that bit. Hammer mode is off. If the drill has a clutch, set it so a grab won't twist your wrist. Confirm the chuck is tight. A slipping bit ovalizes the start.
- Dimple, then stand the bit up. Hold the bit at a slight angle, or seat it in the guide, until a small ring forms. Then bring it square. Starting flat on a slick glaze is how the bit walks off the mark.
- Feed light, and run the cooling you already chose. Water at the rim for diamond or glass-and-tile bits. On a dry-rated bit, pull back often so heat can leave the steel. This step is only doing the cooling plan, not deciding it.
- Don't lean harder when the sound changes. After the glaze breaks, keep the same steady feed. The body of the tile is cutting differently, not asking for more force. Forcing the tool is how a clean dimple becomes a chip.
- Stop when the rim clears the tile. The moment you're through the ceramic, ease off. Grinding on into cement board or mortar wears the diamonds and can oval the hole you just made. The stack behind the tile is the next decision, with a bit rated for it.
- Back the bit out while it's still turning slowly. A stopped bit dragged sideways catches the rim and chips the exit edge. Let it spin, withdraw straight, then switch the drill off.
A wandering start makes the entry chip. Hammer mode starts cracks under the contact zone before you can see them.
Support, tape or a guide, rotary only, light feed, the cooling plan, and a hard stop at the back of the tile. That's the whole hole in the ceramic.
What to Do After the Bit Breaks Through
When a tile hole goes wrong at the last second, it usually goes wrong at the back face of the tile, where the bit leaves ceramic and meets thinset. Behind that face sits thinset, then cement board, brick, concrete, a stud bay, or a pipe. The accessory that ground the glaze is often the wrong tool an eighth of an inch later, and dust control gets stricter once you are cutting masonry.
OSHA's silica standard for construction treats handheld and stand-mounted drills on crystalline-silica-containing materials as tasks that call for a shroud or cowling, airflow the equipment maker specifies, highly efficient filtration, and HEPA cleanup. Set that capture up before the bit leaves the tile, because the backer turns into airborne dust within seconds of contact.
Layer by layer
| Layer | What to do | Stop or switch when |
|---|---|---|
| Glaze | Tape or guide, low speed, light pressure | Bit tracks in a dimple |
| Tile body | Steady feed, water or pauses, no hammer | Bit just clears the tile |
| Thinset and cement board | Ease pressure so the bit does not grab | Hole is through the backer |
| Brick or concrete | Keep the drill square, dust capture running, and stay in rotary until the bit sits fully inside the masonry | Anchor depth is reached |
| Shower or wet room | Limit depth, avoid slicing the membrane, seal the penetration | Framing and services are located |
Glaze. Tape or a guide, low speed, light pressure, until the bit tracks in a dimple. If it skates, you are not ready for the body of the tile.
Tile body. Hold the same steady feed, wet or in pauses, with hammer mode still off. Stop when the rim just clears the tile. Continuing to grind the backing ovalizes the ceramic and wears a diamond edge on material it was never meant to cut.
Thinset and cement board. Ease the pressure. Thinset can grab a hollow bit and yank the drill sideways. Cement board cuts, though it is a long way from porcelain, so a light feed keeps the hole round and stops the tile from cracking when the bit suddenly bites.
Brick or concrete. A bit rated only for tile dulls quickly here, so fit one sized for the anchor material and the anchor's printed diameter before going deeper. Keep the shroud on and run the vacuum with HEPA filtration. This is also the first moment a hammer drill earns its place, once the bit sits fully inside the masonry. While any part of the bit still shapes the tile, the drill stays in rotary, and a guide to using a hammer drill explains where that mode change belongs so it happens a layer later than your wrist wants it to.
A stud bay or a pipe. If the finder or a careful test hole shows open space or metal, stop. A tile bit will skate on a pipe or punch straight through a water line. Relocate the anchor rather than forcing the hole deeper.
Showers, membranes, and anchors
In a shower or wet room, locate framing and services before you commit to depth. A membrane or waterproofing sheet often sits just behind the tile and thinset. Drilling through it across a whole bay, or slicing it sideways while you hunt for a stud, gives water a path you will not see until the wall below stains. Limit depth to what the anchor needs, then seal the penetration with a sealant rated for wet areas so the hole cannot wick moisture into the wall.
Match the anchor to the substrate, not to the thickness of the tile. A plastic plug in thin tile over an empty bay will never hold a towel bar. A masonry anchor belongs in brick or concrete, set at the embedment the anchor maker prints, in a hole of the diameter that anchor expects. Tile thickness is only the first part of that hole.
The stopping point is the back face of the tile unless you have already chosen the next bit, the dust capture, and the anchor. Enlarging a glazed hole because the first attempt felt close is how a sound tile becomes a cracked one.
Fix Chips, Cracks, and Walking Bits
Read the failure by where it shows up. Each scar points at one habit, and drilling harder repeats it.
- Chipped entry edge. The bit started off-center or skated on the glaze. Re-mark the center, tape it or clamp a guide, and restart at low speed with the bit at a slight angle until a dimple forms. A fresh hole a short distance away is often cleaner than trying to "clean up" a chipped rim with the same wandering start.
- Radial cracks running from the hole. Feed was too high, or hammer mode was on. Drop to a lean, set the drill to rotary only, and check that the bit is square. If cracks already reach the tile edge, that piece is done. Patching won't put the sheet back together.
- A hot bit or glazed-over diamonds. Water stopped, or a dry bit stayed in the cut too long. Stop, let the steel cool until you can hold the shank, restore water, and shorten the pulls. Diamonds that look shiny and smooth have stopped cutting. More pressure only polishes them further.
- An oval or enlarged hole. The bit moved sideways as it broke through, or a loose tile shifted on the bench. Stop when the rim clears the tile, and support loose tile on a flat scrap so the exit can't flex. An oval hole won't hold a snug anchor even if the face looks acceptable.
- The bit stalls in the backer. Pressure is too high, or a tile-only bit is now in masonry. Ease off. If you're past the tile and into brick or concrete, switch to a masonry bit sized for the anchor instead of leaning on diamond grit that was meant for ceramic.
- The edge still chips after a careful restart. Confirm the tile against the match you made at the start. A spear that belongs on glazed ceramic will chip dense porcelain no matter how light your hands are. Re-match the row before you try a third hole.
A wood-style point that tracks in pine won't fix a bit that walks on glaze. Pilot point drill bits are built for a different start, in materials that can take a sharp lead. On tile, the dimple comes from tape, a guide, and a slow angled touch, not from a pilot meant for lumber.
A second failure on the same tile means the bit row is wrong, or hammer mode crept back on. It doesn't mean you need more pressure.
Pick the Bit and Log the Job
A clean hole in tile is decided at the bench, not at the wall. Four checks settle the job before the drill leaves the case, and a one-line note keeps you honest once dust and noise start making decisions for you.
- Name the tile from the match row. Glazed wall ceramic and glass are one family. Dense porcelain and hard vitrified tile are another. If a steel knife won't scratch the face and the tile was sold as floor porcelain, treat it as the hard family.
- Buy for that family. Porcelain or hard vitrified tile gets a diamond-coated or hollow-core diamond bit, run wet or under a real dust shroud. Ordinary glazed ceramic and glass can take a spear-point glass-and-tile bit at low speed. Swapping those roles to save a trip to the store is how a face chips.
- Add a second bit only if the hole continues. Brick, block, or fiber cement behind the tile is mixed work, and a carbide multi-purpose bit can cover that stack. Drill the ceramic with the tile bit first, then change bits for the backer. Diamond grit pushed into masonry past the tile only overheats and polishes itself dull.
- Check fit, not just material. The diameter has to match the anchor or fitting, not land close enough. A hex shank only helps if it seats in the chuck you'll run, and the listing has to allow wet use if your dust plan is water at the rim.
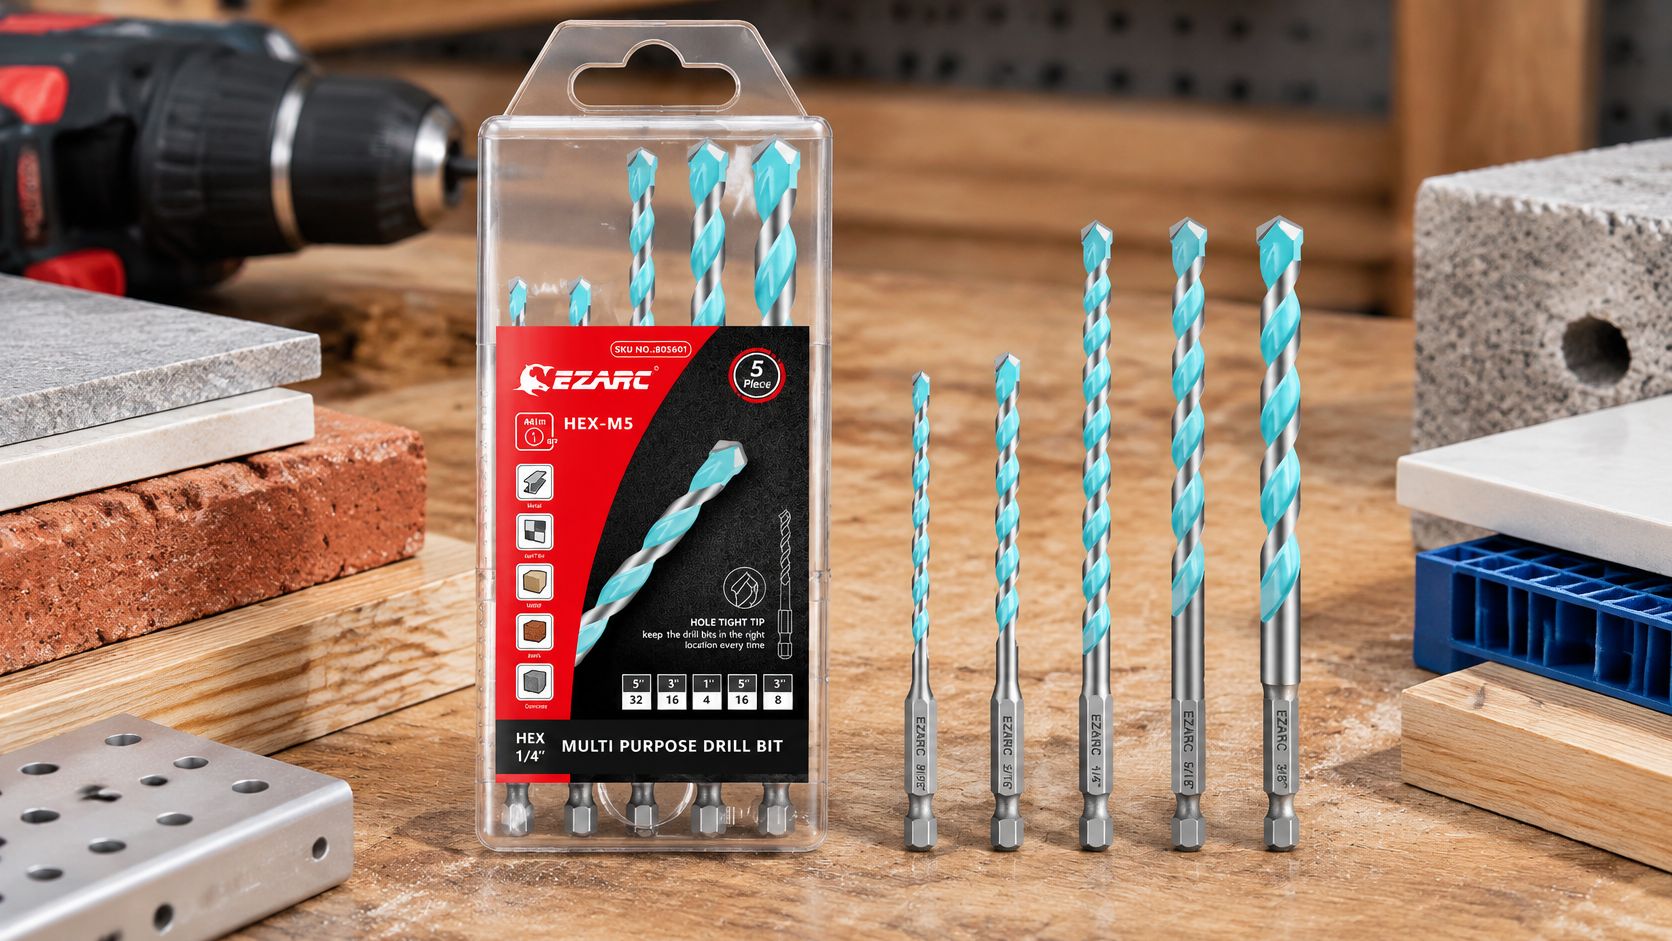
For that second stage, the Hex Shank Multi-Purpose Drill Bit Set For Metal/Wood/Block/Plastic is a tungsten carbide tipped set whose hex shank locks into an impact driver or a hammer drill used as a driver. Keep hammer action off while any bit is still in the ceramic.
Write the log on the tape beside the mark before you drill. One line per item is enough:
- Tile type. Glazed ceramic, glass, or porcelain.
- Bit row. Spear, diamond, hollow core, or carbide only where the maker allows.
- Speed. The number for that bit, not a guess carried over from a different design.
- Dust control. Wet, vacuum with a shroud, or both.
- Stop layer. Back of the tile, through the backer, or anchor depth in masonry.
That note is what you follow when the pitch of the drill changes and your hands want to push. The hole stays round because the decision was made while the tile was still whole.
EZARC Tools builds drilling accessories for the layered work this job is, from bits that have to live in mixed materials to the rest of a drilling kit for metal, wood, and masonry. Match the tile drill bit to the glaze first, then pick the accessory that can finish the layer behind it without cracking the face you already cut. Visit EZARC Tools to compare those drilling options before you chuck the next bit.