X Lock Grinding Discs: Compatibility and Safe Use
Learn how X Lock Grinding Discs mount, which disc types suit each job, and the compatibility and safety checks to run before you use one.
November 15, 2026
You're halfway through cleaning up a weld when the flap disc needs changing. A tool-free mount sounds useful, especially when the wrench has disappeared under the bench. But before you order X-LOCK grinding discs, check whether your grinder has an X-LOCK interface, rather than a threaded spindle or a twist-on holder for a die grinder.
Those systems can look similar in a product photo. They aren't interchangeable. The quick-change connection makes changing an accessory easier; it doesn't decide whether that accessory is safe for your tool or suitable for the work.
Table of Contents
- How the X-LOCK Mount Works
- Which Disc Type Fits Each Job
- Compatibility and Safety Checks Before Mounting
- How to Mount and Change a Disc Safely
- Fixing Slipping, Stuck or Wobbling Discs
- Ordering a Compatible EZARC Disc
How the X-LOCK Mount Works
During weld cleanup, a worker might switch from an abrasive disc that removes material to one that blends the remaining scratches. With a genuine X-LOCK angle grinder, the accessory engages directly with the tool's matching locking mechanism. There's no conventional retaining nut to tighten with a wrench.
The mounting illustration shows the convenience of a tool-free changeover.
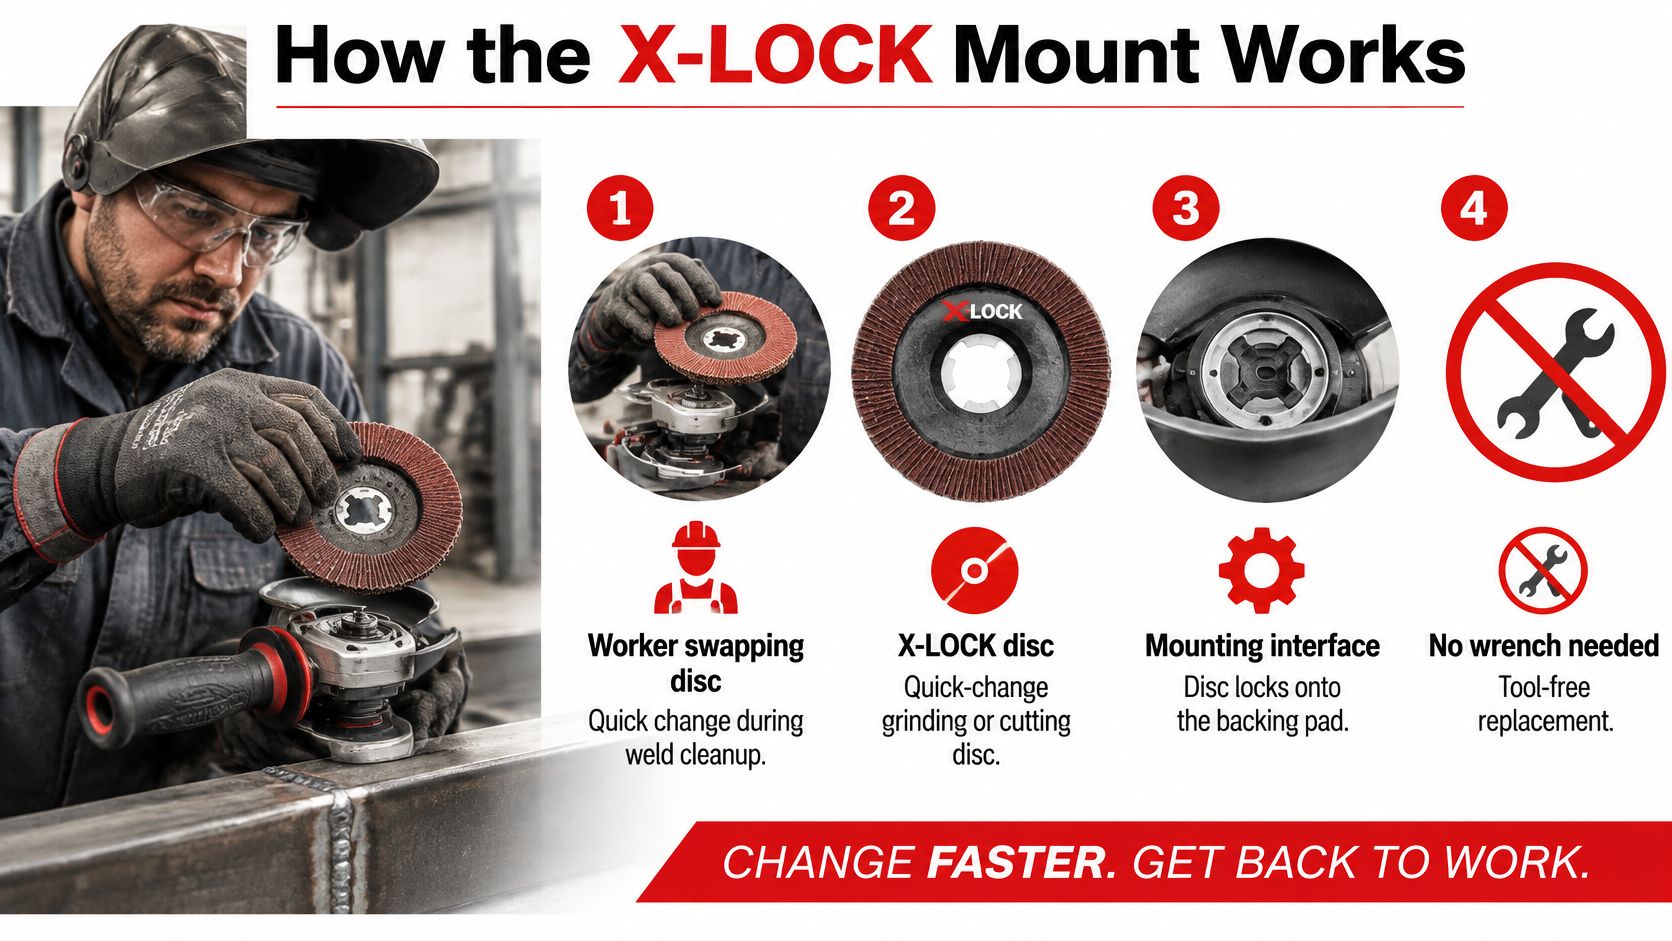
Think of a camera lens fitting: matching features must align, and the accessory must seat completely before it's secure. The analogy stops at the locking action, though. An X-LOCK accessory presses into its matching mount until it engages; it isn't a roll-lock disc that you screw into a rubber backing pad.
Separate the mount from the abrasive
The abrasive face tells you what the accessory does. Its underside tells you how it attaches. A flap disc, cutting wheel, or other accessory still needs the correct connection, regardless of how familiar its working surface looks.
For a small twist-on sanding system, you match the disc's fastener, its holder, and the holder's shank or tool connection. An X-LOCK angle grinder instead uses its dedicated accessory receiver. Don't assume a backing pad or adapter belongs in the assembly unless the manufacturer specifies it.
Practical rule: Quick-change describes a convenience. X-LOCK identifies a particular mounting system.
Listings may use terms such as roll lock, twist lock, or quick change. Those words alone don't establish X-LOCK compatibility. A spiral-button disc for a die grinder is a different accessory from an X-LOCK angle-grinder disc.
Before buying, compare the accessory's hub with the receiver on your actual tool. Then read the compatibility statement, not just the product title.
Which Disc Type Fits Each Job
| Disc type | Typical job | Common size | Key limit |
|---|---|---|---|
| Flap disc | Blending welds, finishing stainless, deburring | Diameter approved for the grinder and guard | Coarse abrasive leaves deeper scratches; finer abrasive refines the finish |
| Ceramic flap disc | Stock removal on steel and stainless | Diameter approved for the grinder and guard | Select for material removal and the intended working pressure |
| Curved flap disc | Fillet welds and tight corners | Compact disc matched to its holder | Curved roll-lock versions aren't automatically X-LOCK accessories |
| Stripping disc | Removing paint, rust, scale, and surface contamination | Diameter approved for the grinder and guard | Cleaning isn't the same as final finishing or weld leveling |
| Metal cut-off disc | Cutting bar, tube, and stainless | Marked diameter and arbor or hub must match the tool | Cutting only; never use the side for grinding |
| Fiberglass reinforced cutting disc | Cutting hardened steel, aluminum, or plastic when specifically labeled | Size approved for the particular rotary tool | Reinforcement doesn't make every wheel suitable for every material |
| Diamond cutting wheel | Cutting rebar, steel, iron, or stainless when labeled for metal | Manufacturer-approved diameter | A masonry diamond wheel isn't automatically a metal-cutting wheel |
The table compares abrasive jobs, not a guarantee that every category is available with every mounting system. Choose the working action first, then find an accessory with the connection and ratings your tool accepts.
Removing metal versus improving the surface
A flap disc combines material removal with surface blending. Use it to soften a sharp edge, blend a weld into the surrounding plate, or refine grinding marks. Keep it moving so you don't create a hollow beside the weld.
Ceramic abrasive is an option for demanding stock removal on steel and stainless. Don't assume the grain name guarantees a particular service life, though. Pressure, workpiece shape, disc construction, and the amount of metal removed all affect how an accessory performs.
A curved flap disc can reach the transition inside a fillet weld more readily than a broad flat face. That shape doesn't make it suitable for forcing into a gap. Keep the holder clear of adjacent surfaces and avoid catching the disc edge.
For comparisons between flap-disc constructions, use the EZARC, Diablo, and Milwaukee flap-disc comparison alongside the specifications for your tool.
Cleaning, cutting, and finishing need different choices
A stripping disc suits coating removal and surface cleaning. If the job is removing paint from a bracket before refinishing it, start with a coating-removal accessory rather than grinding away sound metal beneath the paint. Thick weld reinforcement requires a material-removal tool, not a more forceful pass with a cleaning disc.
Cut-off wheels work through their abrasive rim. Fiberglass reinforcement supports the wheel's construction, but it doesn't authorize side loading. Diamond wheels also need a material-specific label: choose a metal-cutting design for metal work.
For abrasive finishing, a lower grit designation generally means a coarser cut. Move toward finer abrasive as you refine the scratches, but don't promise yourself a paint-ready or polished surface from grit alone. The coating system or desired polish determines the final preparation.
The job selects the abrasive. A matching mount never turns a cutting disc into a grinding disc.
Compatibility and Safety Checks Before Mounting
Start with the tool's interface and rated speed, not the disc's appearance. Write those details down before comparing accessories. A wheel that looks right can still have the wrong hub, insufficient speed rating, or an application your grinder doesn't support.
The illustration highlights the initial fit decision.
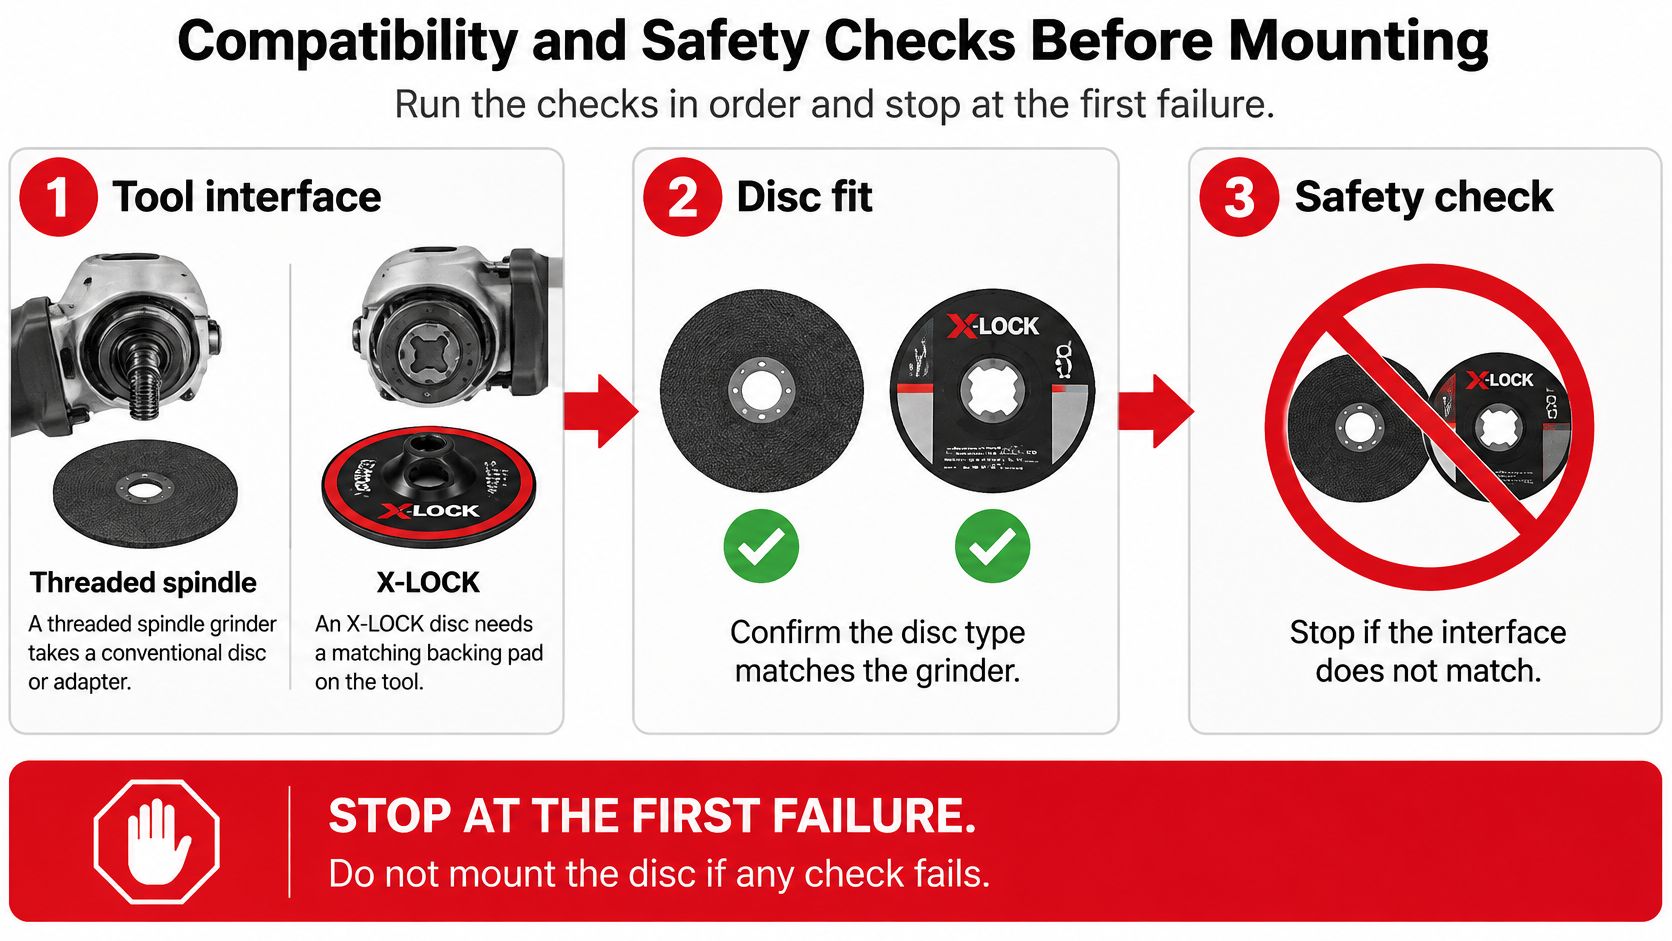
Follow the checks in order
- Identify the tool interface and record its maximum speed. An X-LOCK receiver, a conventional threaded spindle, and a die-grinder collet are different connections. Don't put a conventional accessory onto an X-LOCK receiver or add an adapter unless the tool manufacturer explicitly approves that arrangement. Some accessories may have documented compatibility with another spindle system; verify the exact item rather than assuming compatibility works in both directions.
- Compare diameter with the tool and guard. The disc must fall within the grinder's approved capacity and the guard's intended coverage. Never remove the guard to accommodate an oversized accessory.
- Check the arbor or hub. The connection must engage without forcing, filing, drilling, or improvised spacers. For a spindle-mounted accessory, check the bore and specified mounting hardware. For X-LOCK, inspect the mating features and locking receiver instead.
- Check thickness and clearance. A thicker accessory can interfere with nearby parts even when its diameter seems suitable. Confirm clearance around the guard and mounting assembly, using the manufacturer's instructions for the accessory type.
- Compare the marked maximum RPM with the recorded tool speed. The grinder must not exceed the accessory's rating. With a separate holder or backing pad, check its rating too. Don't rely on how lightly you intend to squeeze the trigger.
- Confirm the application. Match both the workpiece material and the operation. A cutting wheel needs cutting use; a surface-cleaning disc needs a cleaning task. For practical distinctions between stock removal and surface work, consult the guide to grinding metal.
One failed check means stop. A successful click doesn't cancel a failed speed or guard check. The OSHA angle-grinder safety guide emphasizes matching accessories to the equipment, keeping within the marked speed, and positioning the guard between the operator and the wheel.
Treat the assembly as a safety system
The grinder, accessory, locking mechanism, and guard work together. OSHA's hand and power tool guidance requires appropriate guarding over the spindle end, nut, and flange projections, with the guard properly aligned, and warns against exceeding a wheel's maximum operating speed. A damaged or overspeed wheel can break during startup or operation, before it ever touches the work.
Prepare the work area as carefully as the mount. Clamp the workpiece to a stable surface, keep sparks away from combustible materials, and maintain room for a controlled stance.
- Protect eyes and face. Wear suitable safety glasses and a face shield for grinding hazards. The Refinery Work Wear Canada safety glasses guide is a useful resource when reviewing eye-protection choices.
- Protect hearing and breathing. Select hearing protection and assess dust, coating, and ventilation hazards before starting.
- Choose close-fitting workwear. Use task-appropriate gloves without loose cuffs, and keep clothing clear of rotating parts.
Use the demonstration as a visual aid, while following your grinder's own mounting instructions.
How to Mount and Change a Disc Safely
Set the replacement accessory on a clean bench before opening the tool's locking mechanism. Keep the disc label and grinder instructions available so you're not making a compatibility decision while holding the tool.
The illustrated sequence begins with isolating the power.
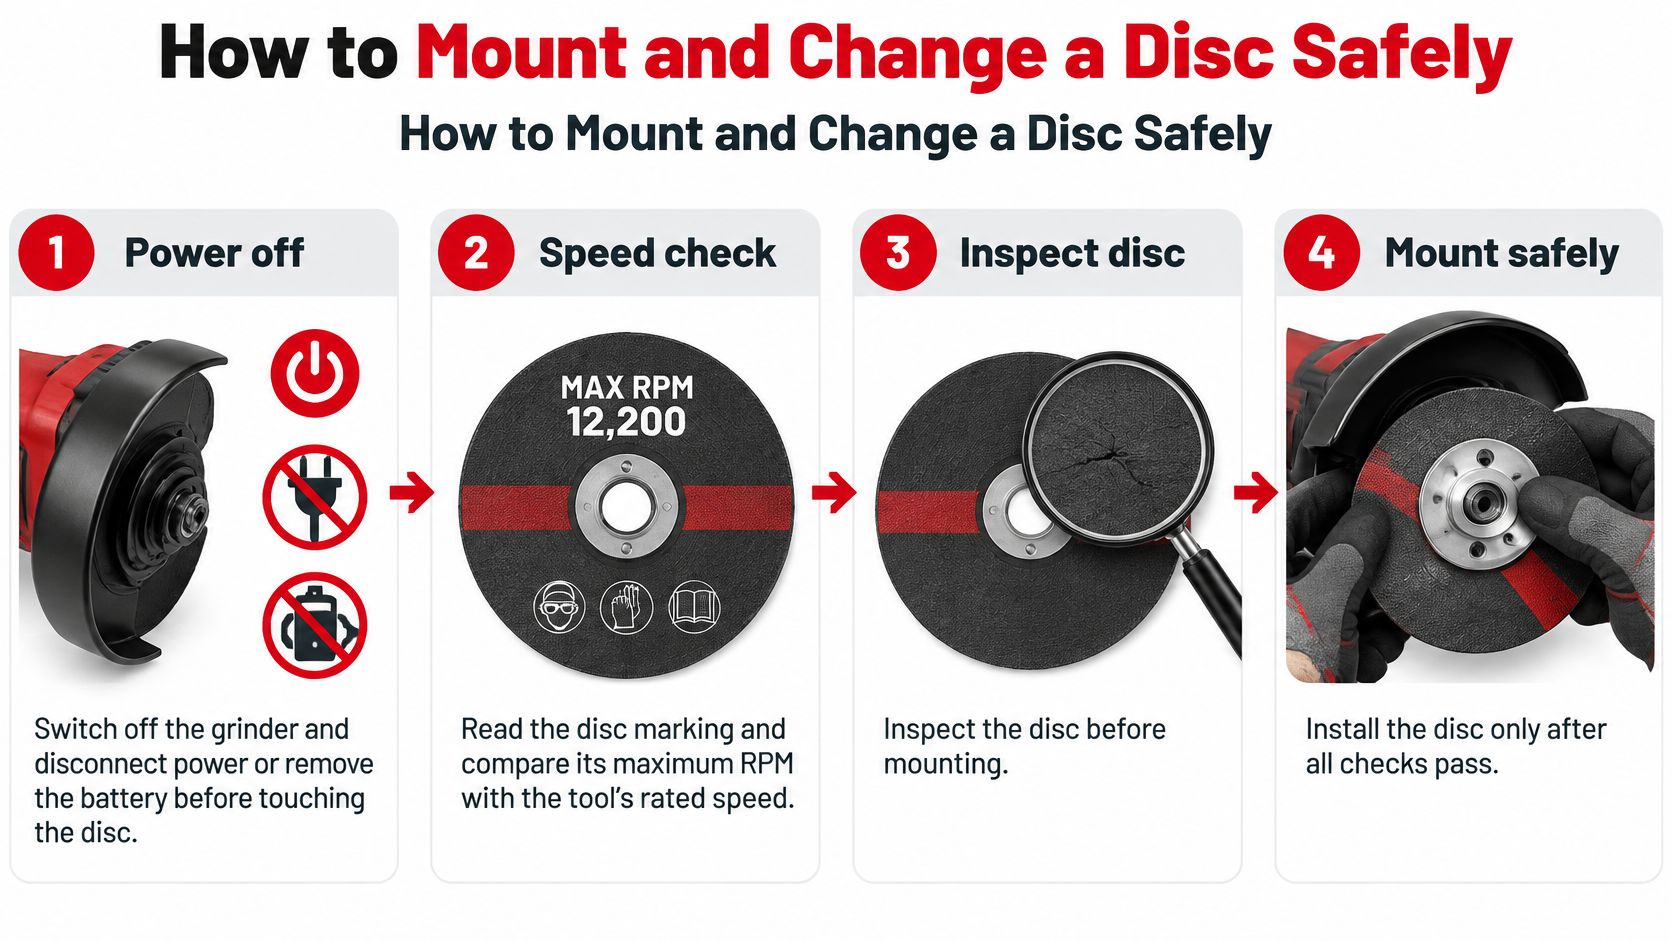
- Switch off and isolate the grinder. Unplug it or remove the battery before touching the accessory. A released trigger isn't protection against accidental starting.
- Read the markings. Confirm the accessory's identity, intended material, and speed rating before installation. If essential markings are unreadable and you can't establish the specification, don't use it.
- Inspect for damage. Check for cracks, chips, distorted backing, and damaged mounting features. OSHA's construction abrasive-wheel rule requires inspection and ring-testing before mounting; use the applicable test procedure for the wheel construction, since not every abrasive accessory can be meaningfully ring-tested.
- Position the correct guard. Secure it in the approved position before fitting the accessory. Check that it hasn't shifted during the previous operation.
- Engage the X-LOCK mount. Align the accessory with the receiver and press it into place according to the tool instructions until it locks fully. Don't substitute the twist-on procedure used by roll-lock sanding holders.
- Check seating and clearance by hand. With power still isolated, verify secure engagement and carefully rotate the accessory to check for interference. Keep fingers away from sharp edges.
- Perform the prescribed no-load check. Restore power only after clearing the area. Stand out of the wheel's plane and stop immediately if you notice vibration, unusual noise, or irregular rotation.
- Make controlled contact. Use the working face, angle, and pressure specified for that accessory. Guard-opening limits aren't instructions for the angle at which you should hold a disc against metal.
Removing the accessory
Stop the grinder, let the accessory come to a complete rest, and isolate power again. Operate the X-LOCK release mechanism as instructed, supporting the accessory so it doesn't drop; don't try to unscrew it like a roll-lock disc.
If you're changing from abrasion to polishing, select the appropriate accessory using the angle-grinder polishing-wheel guide. A polishing accessory needs its own compatibility and operating checks.
Fixing Slipping, Stuck or Wobbling Discs
If a disc moves relative to its mount during grinding, stop rather than pressing harder. On an X-LOCK tool, insecure engagement calls for inspection of the accessory and locking receiver. On a twist-on system, the holder and disc fastener also need checking.
| Symptom | Likely cause | Fix |
|---|---|---|
| Disc turns loose on the pad | Incomplete seating or worn holder on a pad-mounted system | Isolate power, inspect the connection, reseat correctly, and replace a worn holder |
| Disc will not release | Debris, binding, or damage in the mechanism | Use the specified release procedure; clean accessible debris only with power isolated |
| Disc wobbles at speed | Bent accessory, damaged hub, or mismatched mounting parts | Stop, remove the suspect accessory, and inspect the mount before fitting a replacement |
| Disc sheds chips or fragments | Damage, inappropriate loading, or unsuitable accessory | Remove the damaged disc from service and reassess the operation |
| Disc does not fit the spindle | Wrong bore, hub, or mounting system | Obtain the correct accessory or an explicitly approved mounting arrangement |
| Cracks or damage found | Impact, wear, storage damage, or defect | Remove from service immediately |
Don't force a release
A stuck disc isn't a reason to hit the abrasive with a hammer or clamp its edge with pliers. Let a hot accessory cool before handling it, then use the tool's release control without forcing it. Keep cleaning tools out of enclosed mechanisms unless the maintenance instructions permit access.
If the release still won't operate, take the grinder out of use for inspection. Don't dismantle a loaded locking mechanism by improvisation.
A damaged abrasive is a replacement job, not a repair job.
Wobble also needs diagnosis, not merely a new disc fitted and run at full speed. Inspect the receiver or holder for damage and check that the replacement seats correctly before restarting.
A disc that sheds fragments must leave service. Changing pressure or grit may improve the next operation, but it doesn't restore the damaged accessory. If the grinder won't switch off or stop normally, keep it pointed safely away, isolate its energy supply when safe, and remove the tool from service too.
Ordering a Compatible EZARC Disc
A quick-change interface saves time on every disc swap, but it never replaces the safety system behind it. Order by your tool's connection and maximum rated speed first, then by the task. Never order by the phrase quick change alone. A roll-lock die-grinder disc will not click onto an X-LOCK angle grinder, no matter how similar the abrasive face looks.
For die-grinder finishing work, we offer the EZARC 10PCS Zirconia Flap Disc Set for Die Grinder, 3" Flat & 2" Curved 40/80 Grit Roll Lock Discs for Weld, Rust & Paint Removal, regularly priced from $23.97. The set combines 3-inch flat and 2-inch curved discs in 40 and 80 grits for weld, rust, and paint removal. These are roll-lock discs built for a die grinder, not X-LOCK accessories.
The product image shows the practical difference: each disc mounts on its own small holder rather than seating directly on an angle-grinder spindle.
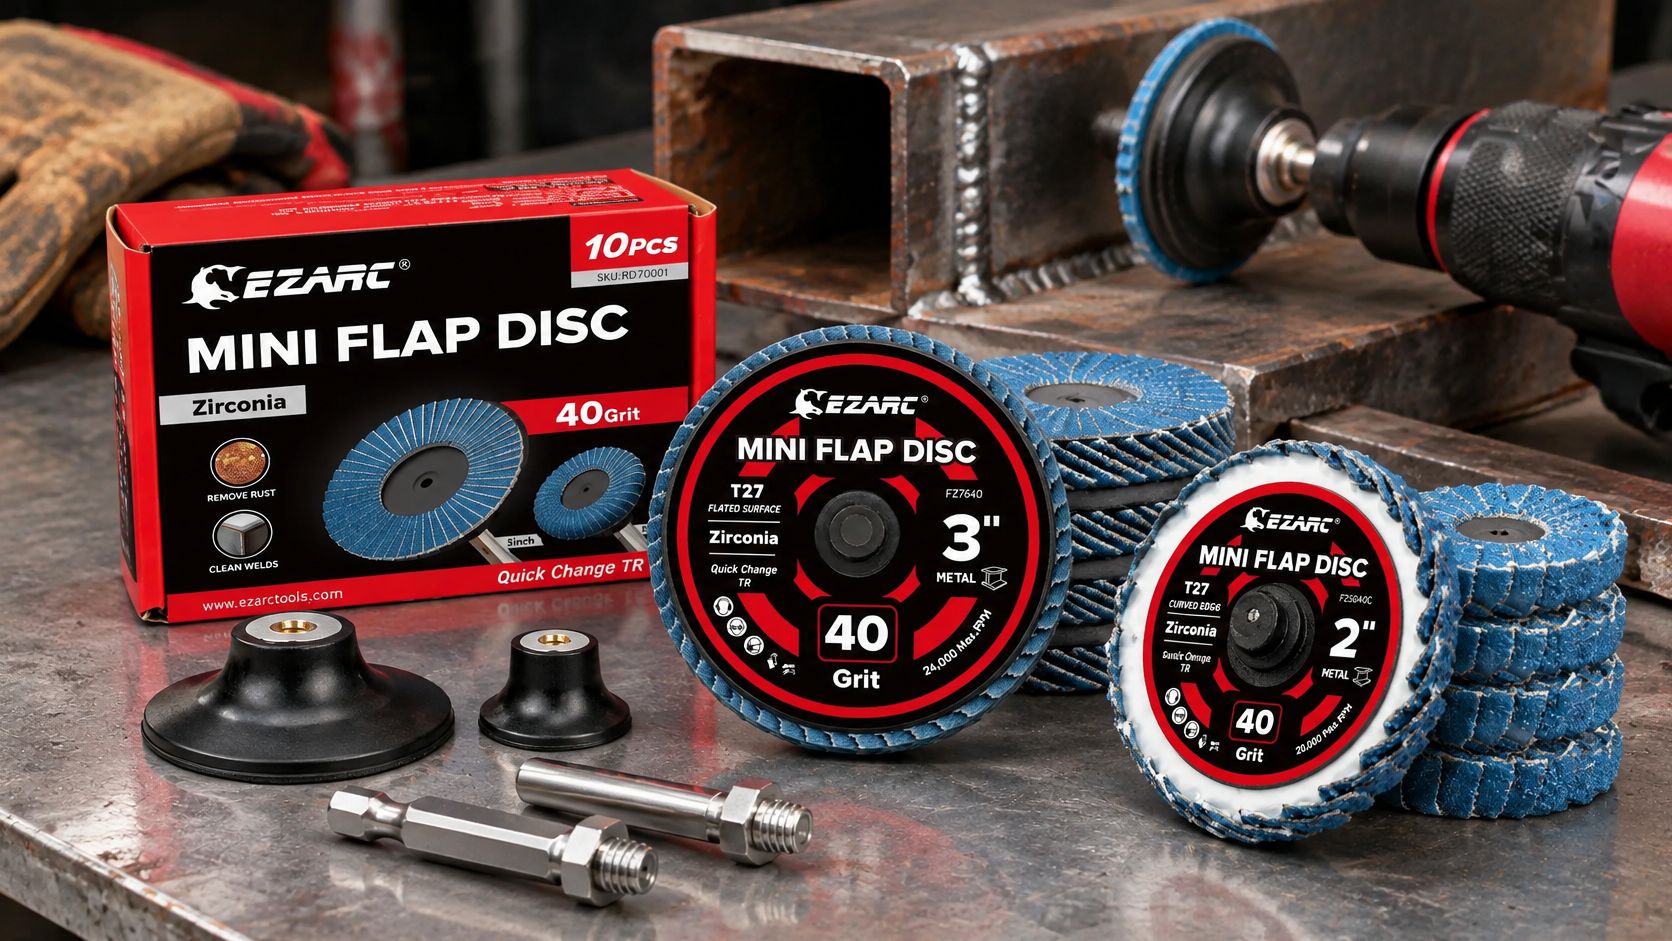
Make the listing answer the fit question
A photograph of a flap-disc face tells you nothing about fit. The listing has to state the connection and operating limits in words you can check against your tool.
- Start with your grinder. Note the mounting system and maximum speed marked on the tool before you look at any disc.
- Match the connection in writing. The listing should name the mount plainly, the way this set states roll lock in its title.
- Confirm the grit options. This set comes in 40 and 80 grit, so check that spread suits the weld cleanup or coating removal you plan before ordering.
If the listing doesn't establish the fit, leave the item out of your basket until you can confirm it.
EZARC Tools offers cutting, grinding, sanding, and polishing accessories for material-specific work. Visit EZARC Tools with your grinder model and mounting details at hand, then choose an accessory whose connection, rating, and intended job match your setup.
Share Link Back to blog