Grinding of Metal: Methods, Wheels and Safe Setup
Learn grinding of metal methods, how to choose abrasive wheels, safe setup, heat control and fixes for common grinding problems.
November 11, 2026
You've got a rough weld bead on a steel frame, a pile of cut edges to clean up, and a shaft that needs a controlled finish. Reaching for the nearest grinder is tempting. Before you fit a disc, though, identify the base metal and anything covering it. That decision sets both the abrasive you need and the dust hazard you'll have to control.
Good grinding of metal isn't about pushing harder until the surface looks smooth. It's about choosing a process that removes the unwanted material without damaging the part, contaminating its surface, or exposing the operator to an avoidable hazard.
Table of Contents
- Metal Grinding Methods at a Glance
- How Grinding Removes Metal and Creates Heat
- Matching the Abrasive Wheel to Your Metal
- Prepare the Workpiece and Spot Hidden Hazards
- How to Set Up and Run a Grinder Safely
- Working Long Shifts Without Fatigue or Heat Damage
- Common Grinding Problems and How to Fix Them
- Build a Pre-Grind Checklist for Every Job
Metal Grinding Methods at a Glance
A fabricator can rough-grind a frame weld and finish a precision shaft in the same week, but those jobs don't belong to the same setup. Grinding is a family of methods, ranging from handheld stock removal to machine-controlled finishing. The required geometry matters as much as the appearance.
Start by deciding what must remain after grinding. A weld blend needs a smooth transition without thinning the surrounding plate. A bearing seat requires controlled diameter and roundness, not just a shiny surface.
Grinding methods by tool, job and finish
| Method | Typical Tool | Best For | Finish Quality |
|---|---|---|---|
| Snagging or rough grinding | Angle grinder with a coarse grinding disc | Weld spatter, casting flash, heavy stock removal | Coarse and rough |
| Weld blending and deburring | Angle grinder with a medium-grit flap disc | Smoothing welds and cut edges | Medium |
| Bench or pedestal grinding | Bench grinder with an appropriate wheel | Sharpening tools, shaping small parts | Medium |
| Surface grinding | Surface grinder with a suitable bonded wheel | Flat faces held to tight tolerance | Fine and precise |
| Cylindrical grinding | Cylindrical grinder | Shafts, bearing seats and round parts | Fine and precise |
| Die or detail grinding | Die grinder with mounted points | Tight corners, castings, internal areas | Coarse with roughing points; fine with finishing points |
Choose geometry before appearance
An angle grinder offers access and fast removal, but the operator controls the shape by hand. It's useful for fabrication cleanup, not a substitute for a surface grinder when a face must remain flat and dimensionally controlled.
A flap disc follows contours more readily than a rigid grinding wheel. That helps with blending, but it also makes it easy to round an edge that should stay square. Mounted points reach internal corners, although their small contact area can produce a groove if you hold them still.
Shop-floor judgement: Choose the least aggressive method that can remove the defect without sacrificing the shape you need.
Don't grind a weld flush merely because a flush surface looks tidy. Confirm that the drawing or repair procedure permits that removal. The method sets the tool, while the identified metal determines which abrasive belongs on it.
How Grinding Removes Metal and Creates Heat
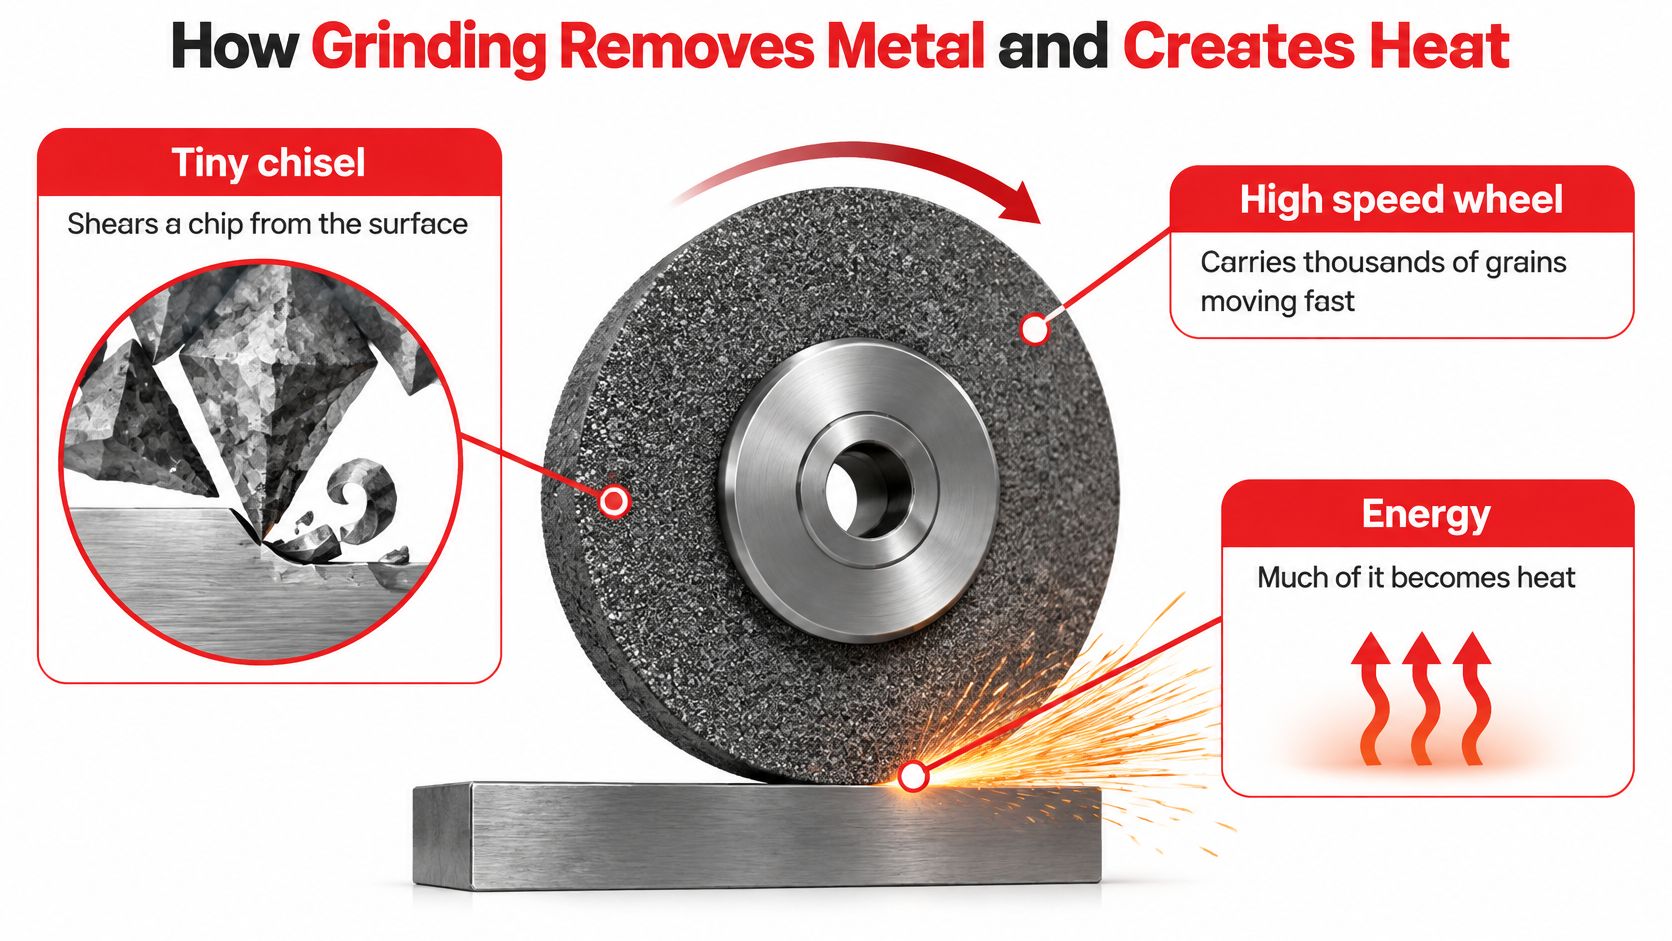
Think of each abrasive grain as a tiny chisel. A sharp grain enters the surface, deforms the metal and shears away a chip. A rotating wheel brings fresh grains through the contact zone continuously, but not every grain cuts effectively.
Some grains slide or plow instead. That distinction explains why a wheel can make plenty of noise and sparks while removing surprisingly little metal.
Follow the energy into the part
Say you're flattening a proud weld bead. Initially, the wheel cuts freely and the grinder sounds steady. As the abrasive dulls, you lean harder to maintain removal, concentrating more energy in the same small contact area.
A substantial portion of grinding energy becomes heat. A technical paper on grinding temperature and thermal damage describes risks including surface burn, rehardening, tempering and microcracks, and identifies a background workpiece temperature below approximately 450–500 °C for commonly used steels as helpful in avoiding visible temper colors and associated damage.
That's a process-control reference, not permission to run every steel part near that temperature. Alloy, heat treatment and service requirements affect what damage is acceptable. A hardened blade deserves a more conservative approach than a cosmetic cleanup on ordinary fabrication steel.
Use machine behavior as an early warning
On a production grinder, spindle power helps reveal changes in the cut before the surface visibly burns. Compare it with the established behavior of a healthy wheel on the same operation. A rising load at unchanged settings deserves investigation rather than an automatic increase in feed.
For a handheld operation, notice a falling motor speed, increasing drag or a sudden need for more pressure. Check the abrasive before blaming the machine.
- Reduce the cut: Ease feed pressure or depth rather than forcing a struggling wheel.
- Restore cutting action: Dress a compatible bonded wheel or replace a spent disc.
- Improve cooling: On wet-grinding equipment, deliver the correct fluid into the contact zone.
- Avoid dwell: Keep the contact moving instead of heating one patch repeatedly.
For coolant selection and delivery considerations, FIRMFG's guide to cutting coolants provides useful context. Don't add liquid to an ordinary electric angle-grinder operation unless the equipment is specifically designed for wet use.
If the metal changes color or the grinder labors, treat the cut as too hot or too heavily loaded and stop to correct it.
Matching the Abrasive Wheel to Your Metal
A wheel that cuts mild steel cleanly can load solid on aluminum or glaze over on hardened stock within a few passes. Identify the metal and whatever coating sits on it before you pick an accessory, because those two facts set the abrasive and the hazard before speed or technique enter the decision.
The abrasive must be hard enough to cut the workpiece and stable enough for the grinding conditions. Grain type, bond, spacing and wheel condition determine whether an accessory keeps cutting or merely drags across the surface. A suitable abrasive mineral doesn't make every wheel containing it right for every machine, so confirm the wheel's stated application and rated speed against your grinder.
Abrasive type and starting grit by metal
| Metal | Recommended Abrasive | Starting Grit | Watch For |
|---|---|---|---|
| Mild carbon steel | Aluminum oxide | Coarse for removal; medium for blending | Blue discoloration from overheating |
| Stainless steel | Ceramic or zirconia | Coarse to medium | Heat and iron contamination; dedicate wheels to stainless |
| Cast iron | Silicon carbide in a compatible wheel | Coarse to medium | Brittle edges and dust |
| Aluminum | Clean wheels specifically made for soft metals | Coarse to medium, with an open-cutting construction | Loading that clogs the abrasive |
| Hardened tool steel | CBN; diamond only for a specifically approved application | Medium to fine | Heat cracks; use controlled, short passes |
| Titanium | Ceramic or zirconia rated for the application | Medium | Heat and combustible fine dust |
| Coated or galvanized steel | Appropriate flap or fiber disc after coating assessment | Medium | Hazardous coating dust and possible fumes |
Separate removal from finishing
A coarse abrasive removes a raised weld efficiently but leaves scratches that must later be removed. A fine abrasive can improve the finish, yet it's a poor choice for taking down a large bead because the operator usually compensates with pressure and dwell, which is how thin stainless warps.
Choose the coarsest abrasive the geometry and finishing allowance can tolerate, then step finer only after the previous scratches are gone. EZARC's explanation of flap-wheel grit and polishing requirements lays out which grit ranges handle removal work and which belong to finishing.
For weld blending on those alloys, our 4-1/2 In. Ceramic Flap Discs for Stainless Steel, Sheet Metal are made for stainless steel and sheet metal, so they suit that cleanup stage. Match the disc to the finish the job requires instead of expecting a coarse flap disc to leave a final polished surface.
Account for the awkward materials
CBN is the usual superabrasive starting point for hardened ferrous steel. Diamond isn't a universal upgrade for steel grinding, because its suitability changes with the process and contact temperature. Use it only where the wheel maker expressly approves the application.
Aluminum needs more than a different grit. A wheel that packs with soft metal stops cutting cleanly and starts smearing, so choose an aluminum-rated construction rather than transferring a steel wheel to the job.
For stainless, keep abrasive wheels and cleaning brushes separate from carbon-steel tools. A clean-looking finish can still carry transferred iron contamination that shows up later as surface rust.
Prepare the Workpiece and Spot Hidden Hazards
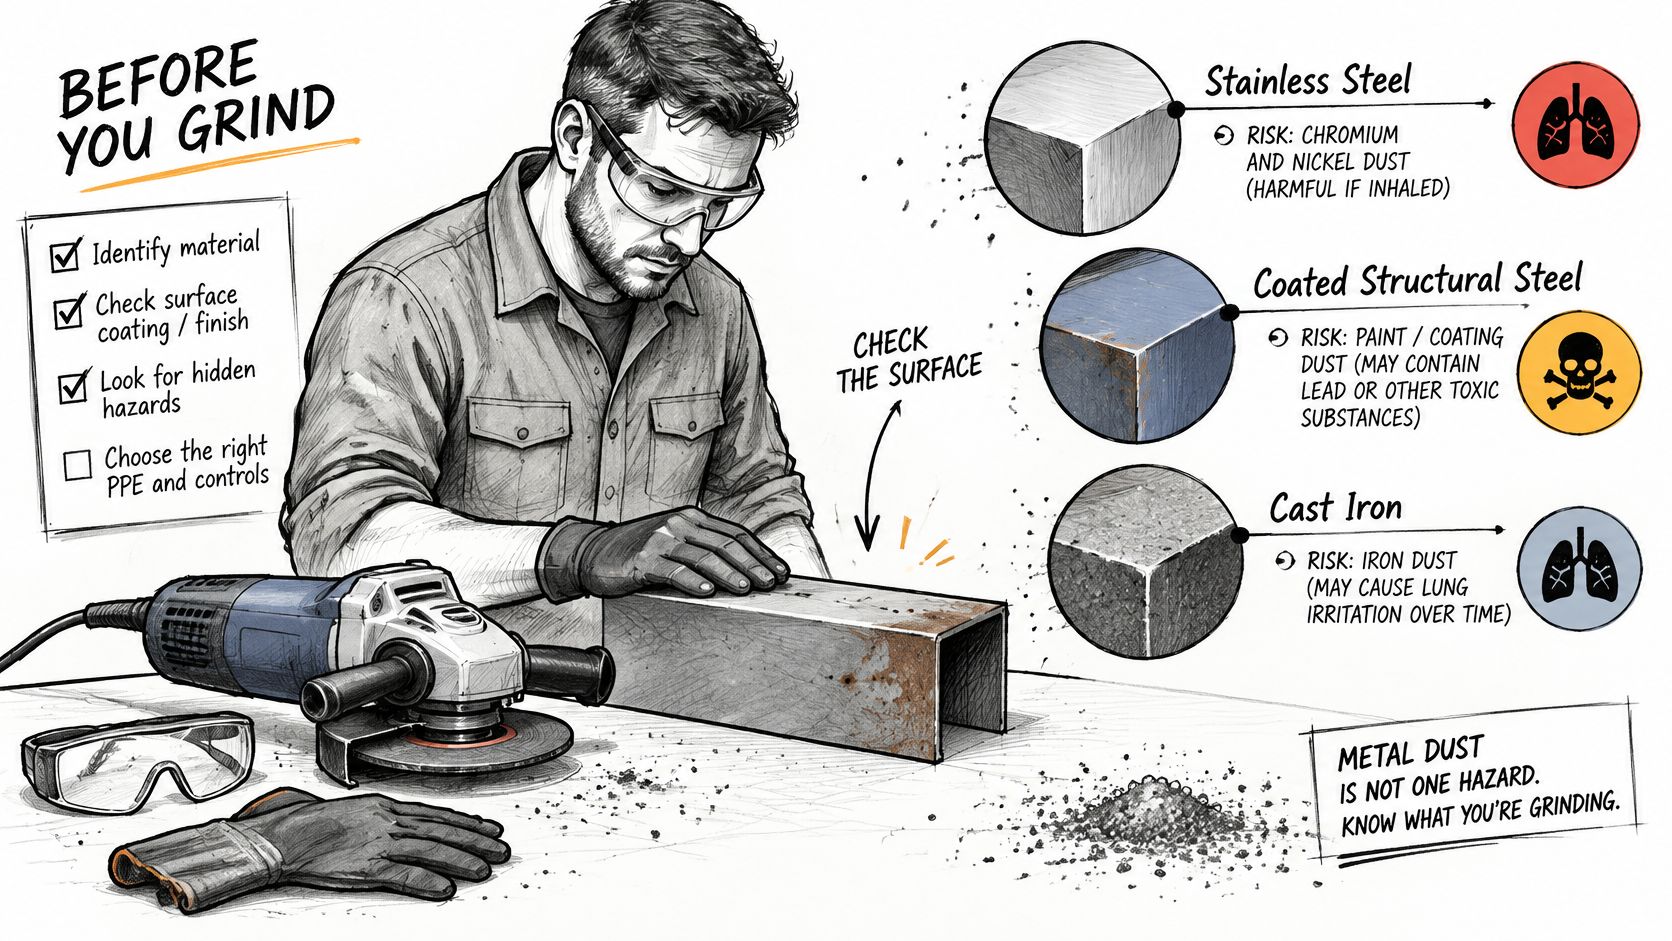
Metal dust covers several distinct hazards. Stainless steel, painted structural steel and sand-contaminated castings can need different exposure controls even when the same grinder fits all three jobs. Identify the base metal and the surface contamination as separate checks before wheel choice, speed or technique.
Start with drawings, purchase records, material markings and coating documentation. A magnet can narrow the possibilities, but it cannot establish an alloy or prove that a part is safe to grind. Some stainless steels are magnetic, and others are not.
Identify before disturbing the surface
Use a spark test only when a competent person can interpret it and the material and location are already safe for spark-producing work. It is a poor first test for an unknown coating or a potentially flammable environment.
- Confirm the substrate: Distinguish steel, stainless, aluminum, cast iron and less familiar alloys.
- Check the coating: Identify paint, primer, plating, galvanizing and residues before abrasion.
- Remove contamination safely: Degrease using a compatible method, then let cleaning agents evaporate completely.
- Plan dust collection: Match extraction and waste handling to the material, not just the visible dust volume.
For relevant work, the OSHA iron and steel foundry enforcement directive is the citation to keep beside the exposure check: it identifies grinding and finishing as potential sources of respirable crystalline silica and metals including lead, chromium, cadmium and manganese, and OSHA's general-industry limit for airborne hexavalent chromium is 5 µg/m³ as an 8-hour time-weighted average, with exposure assessment required for relevant work.
That does not mean every cast-iron part contains silica or every stainless grinding operation produces the same chromium exposure. Assess the actual material, contamination and process.
Set a firm stop-work boundary
Use local exhaust close to the source where the exposure assessment calls for it. A general room fan does not reliably capture dust at the wheel, and an ordinary shop vacuum may be unsuitable for hazardous or combustible metal dust.
Respiratory protection must suit the contaminant and the workplace respiratory-protection program. It cannot replace identifying an unknown hazard.
Stop-work trigger: Don't grind unknown coatings, suspected old lead paint or material in a confined space until a competent assessment establishes the controls and authorization needed.
How to Set Up and Run a Grinder Safely
A grinder that leaves the shop set up wrong will hurt someone before the first weld is cleaned. The accessory has to match the machine, sit on sound mounting hardware and run behind the right guard. A mismatched wheel behind a good guard is still a bad setup.
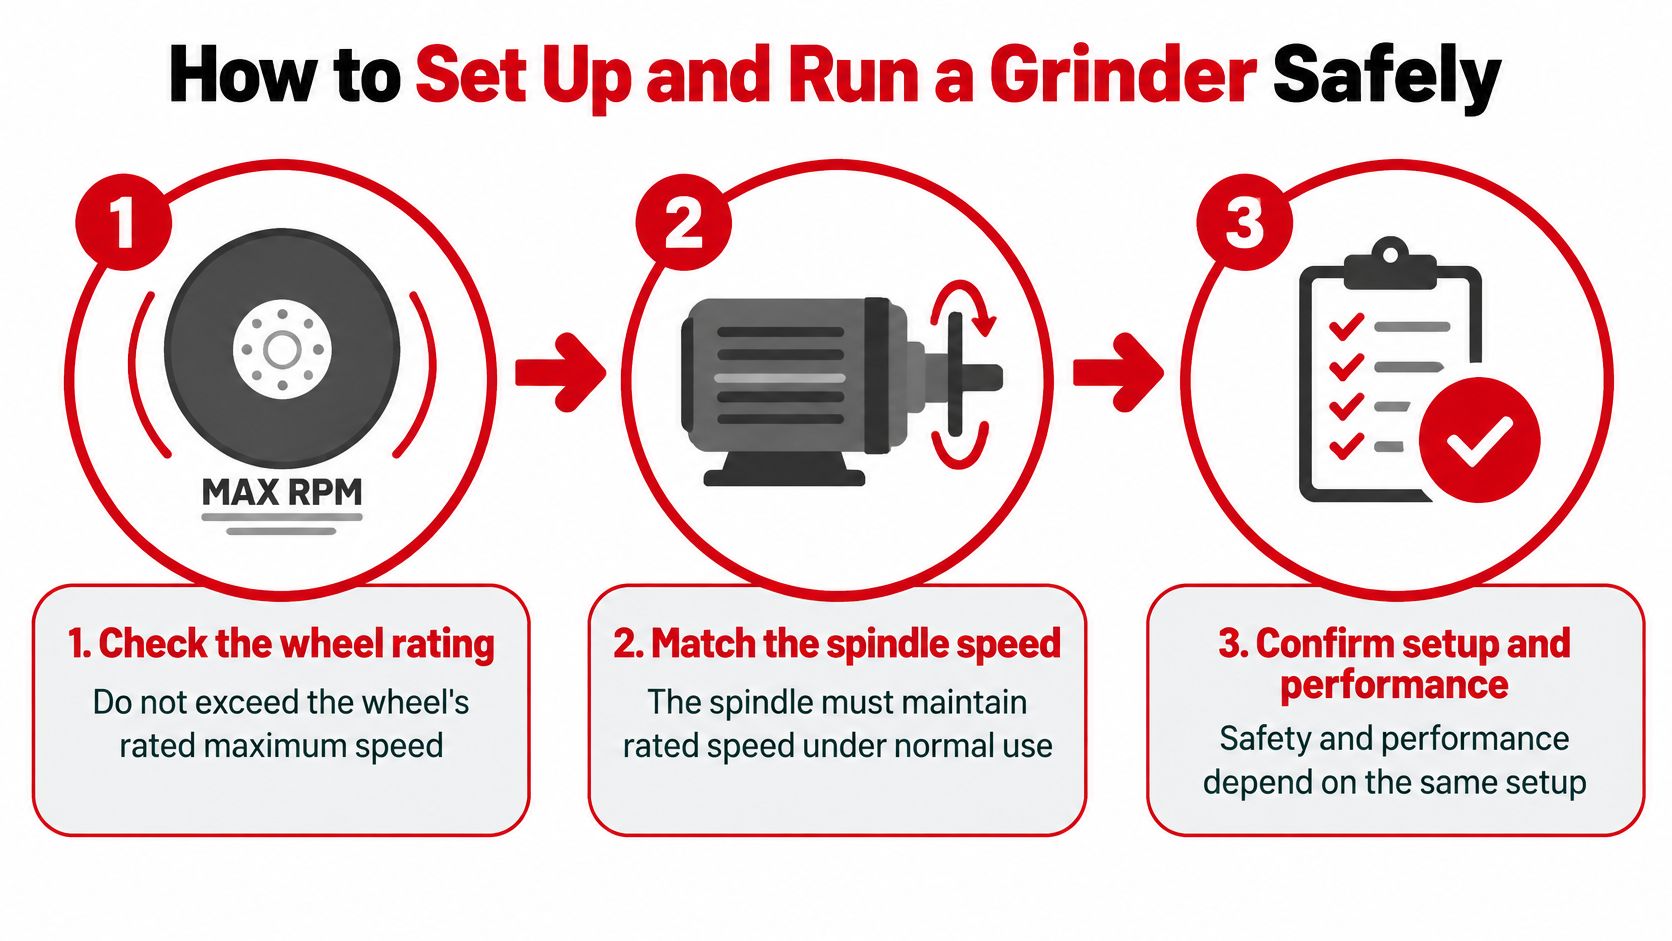
The OSHA construction abrasive-wheel machinery standard requires operators not to exceed the wheel's rated maximum speed and requires enough spindle power to hold rated speed under normal grinding. For applicable bench and floor-stand arrangements, that same standard's guard provisions limit angular exposure to 90°, with an allowance up to 125° where the work requires contact below the spindle's horizontal plane. Those are not universal angle-grinder guard dimensions, so check the rules that govern your machine type.
Run the setup in order
Work through the checks in sequence. Skipping the early ones means every later step is built on a guess.
- Compare speed ratings. The accessory's maximum permitted speed must meet or exceed the grinder's maximum operating speed. Check diameter, arbor and wheel type as well.
- Inspect before mounting. Reject cracked, damaged or contaminated accessories. Perform a ring test only on wheel types for which it's appropriate, following the wheel maker's procedure.
- Fit the correct guard and mounting hardware. Disconnect power first. Use the specified flanges and tightening method, without improvised washers or excessive force.
- Adjust a bench grinder's work rest. Keep the gap close within the machine's specified limit, and readjust it as the wheel wears. Make adjustments only with the wheel stopped.
- Prepare the cutting surface. Dress compatible bonded wheels when necessary. Don't apply bonded-wheel dressing methods to flap discs or thin cutting discs.
- Put on the required protection. Wear safety glasses and a face shield, suitable hearing protection and task-appropriate clothing. Use assessed respiratory protection where required.
- Start clear of the work. Stand out of the wheel's plane during startup and allow it to reach operating speed before making contact. A wheel that was damaged in storage or shipping is most likely to fail in these first seconds.
- Secure and position the part. Clamp it against movement, support large sections and arrange the work within comfortable reach so you steer the tool with both hands free.
Once you are running, keep sparks away from flammables, cables, gas equipment and other people. Never side-load a cutting disc or use it as a grinding wheel. Thin cutting discs are built for radial load on the edge, and pressure on the flat face is what snaps them.
Dress only wheels designed for dressing
On a suitable stationary grinder, use the approved dresser and support arrangement. With the guard in place, traverse the dresser across the wheel face in light, controlled passes until the cutting surface is clean and open.
A shiny or metal-loaded bonded wheel may need dressing, but a damaged wheel needs rejection. A qualified operator may true a serviceable stationary wheel where the machine permits it. A cracked accessory goes in the bin, not back on the spindle.
Remove wheels that have reached their marked wear limit or can no longer provide safe clearance from mounting hardware. Keep handles fitted, maintain a stable stance and reposition the work instead of reaching across a rotating wheel.
Working Long Shifts Without Fatigue or Heat Damage
Standing isn't automatically the safest grinding posture. It gives you room to move around a large fabrication, but it won't help if the work is too low and you spend the shift bent over it.
A 2025 grinding-workstation study reported unacceptable musculoskeletal-disorder risk and observed unsupported bent-back postures. The useful lesson is to redesign the relationship between operator, tool and workpiece rather than assume that a different stance alone will solve the problem.
Bring the work into reach
Set the contact area near a comfortable working height, adjusting for the direction of force and the part's shape. Waist height is a useful starting point for many fabrication tasks, not a fixed ergonomic prescription.
Support the far end of long sections so you aren't stabilizing the part with one hand while steering the grinder with the other. Turn or reposition a frame to reach its underside instead of crouching beneath it with raised shoulders.
- Change posture deliberately: Alternate suitable standing and seated tasks without compromising tool control.
- Rotate the work: Move between grinding, inspection, marking and other compatible duties where possible.
- Take recovery pauses: Relax your grip and shoulders before fatigue changes your technique.
- Preserve control: Change hand positions only when you can maintain the required grip and handle arrangement.
Seated work needs its own assessment. A supported position may ease lower-body loading while still leaving the operator reaching forward or holding the shoulders up.
A comfortable workstation lets you guide the grinder. An awkward one makes you use your body to fight it.
Keep technique consistent as you tire
Use enough pressure for the abrasive to cut, not enough to drag down the motor. Make overlapping passes across the intended area rather than polishing the same spot because it still looks slightly different.
Inspect with the tool stopped. Check the profile, remaining material and scratch pattern before committing to another pass. On thin sheet and edges, stop early enough to avoid turning a small cosmetic defect into a low spot or rounded corner.
More vibration, a wandering scratch pattern or an increasing number of passes can indicate a deteriorating accessory, fatigue or both. None is a reason to squeeze harder.
The right accessory can reduce unnecessary force and awkward reach, but it can't compensate for an unsupported workpiece or a shift spent bent over a low bench.
Common Grinding Problems and How to Fix Them
Most grinder faults show up on the workpiece surface before they show up in the tool. Blue or straw-colored spots on steel mean the surface ran too hot, and the pressure-and-dwell mechanism behind that sits with the fundamentals of how grinding removes metal and creates heat. Grinding the color away does not prove the metal underneath survived.
Diagnose one variable at a time.
If pressure, abrasive, and working angle all change together, nobody can tell which adjustment solved the problem. A disc that loaded up on aluminum or picked up coating residue can also carry that material onto the next workpiece, so treat the accessory as part of the diagnosis.
Grinding symptoms, causes and fixes
| Symptom | Likely Cause | Fix |
|---|---|---|
| Blue or straw-colored spots | Heat from excess pressure or dwell | Lighten pressure, keep the pass moving and confirm coolant delivery on wet equipment |
| Wheel shines and stops cutting | Glazed wheel rubbing instead of cutting | Dress a dressable wheel or replace the accessory |
| Disc clogs with metal | Loading from soft metal such as aluminum | Fit a soft-metal-rated accessory; clean only by an approved method with power disconnected |
| Chatter or vibration | Loose components, wheel imbalance or worn bearings | Stop, isolate power, inspect mounting and have machine faults corrected |
| Deep, uneven scratches | Abrasive too coarse, contamination or uneven contact | Check for debris, then move through progressively finer compatible abrasives |
| Grinder bogs down | Excess pressure, dull abrasive or a machine problem | Ease off, inspect the accessory and remove a faulty machine from service |
Distinguish an abrasive fault from a machine fault
Replacing the disc won't fix a worn bearing. If vibration persists after an accessory change and a mounting check, stop using the grinder until the machine has been inspected.
Tightening the guard rules out one fault and nothing more. Check that the accessory seats correctly, the flanges match and the workpiece isn't flexing under contact.
For weld cleanup, an uneven surface may come from technique rather than grit. The approach in using an angle grinder to clean welds connects accessory choice with controlled blending. Preserve as much surrounding parent metal as the blend allows.
Check the part before restarting
After correcting the tool problem, inspect what has already been ground. A gouge, undersized section or overheated hardened surface needs repair approval or rejection before any further finishing pass.
- Check geometry: Look for dishing, rounded edges and unintended thinning.
- Check cleanliness: Remove loose debris and any coating residue before fitting a finer abrasive.
- Check acceptance requirements: A cosmetic improvement still has to satisfy dimensional and surface-integrity requirements.
Dressing a suitable wheel or replacing a spent disc is a small intervention. Changing abrasive type, separating contaminated tools or rebuilding the work support may require a broader process change.
Either is preferable to forcing a failing cut. When removal slows or the surface deteriorates, stop and recheck before pushing harder.
Build a Pre-Grind Checklist for Every Job
The method sets the tool, the metal sets the abrasive and the hazard, and the setup and posture keep the cut controlled. Put that decision chain on the bench so it survives a rushed start or a change of operator.
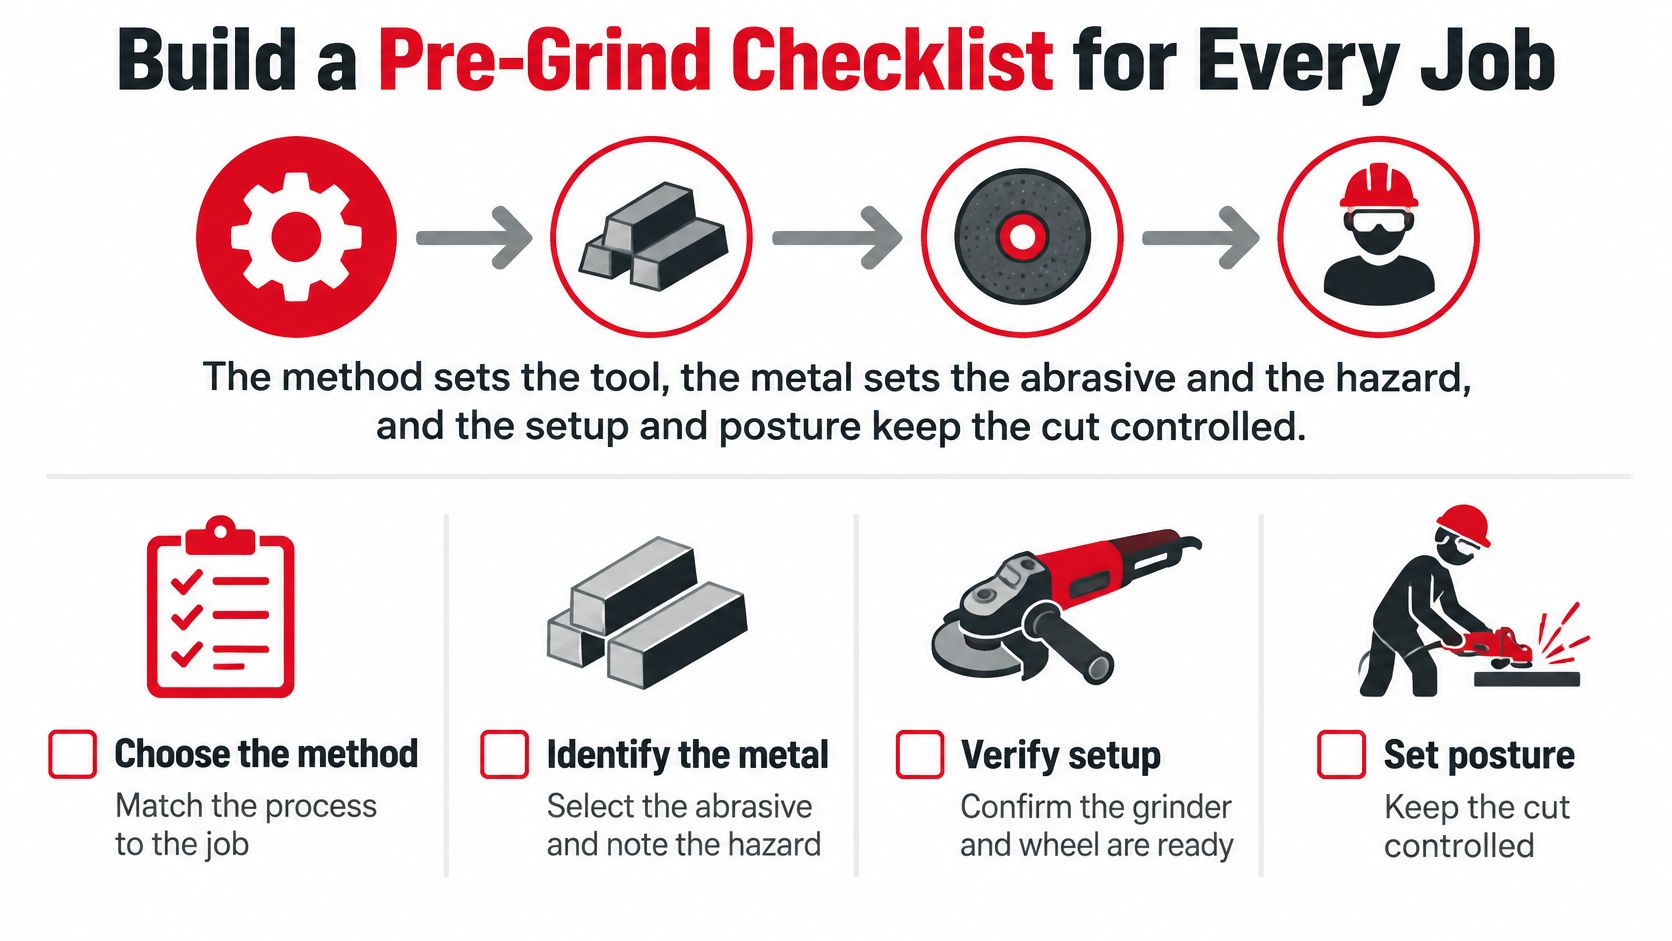
- Confirm the task. Match the method and tool to the required shape and finish.
- Identify the material. Verify the base metal and coating from reliable information; use physical tests only when safe and appropriate.
- Select the accessory. Check application, dimensions, mounting compatibility and rated speed.
- Complete the setup. Verify the guard, workholding, applicable work rest and dust controls.
- Position the work. Support the part and begin with controlled pressure.
- Monitor the cut. Watch machine load, surface condition and removal behavior.
- Honor stop-work conditions. Resolve unknown coatings, suspected lead paint and confined-space requirements before starting.
Make the checklist usable
Keep separate, clearly marked abrasives for stainless and carbon steel. Put rejected accessories somewhere they can't accidentally return to service.
For a procurement cross-check, you can browse OSHA-compliant safety equipment lists from ATEK Distribution, then verify each item against your actual hazard assessment. Stock wheels matched to your main metals and run the checklist before each shift and whenever the job changes.
EZARC Tools offers cutting and grinding accessories, plus stripping discs for paint and rust removal and flap sanding discs for stainless steel and sheet metal. Visit EZARC Tools to select accessories for your identified material and finishing task, then confirm compatibility with your grinder before starting work.
Share Link Back to blog